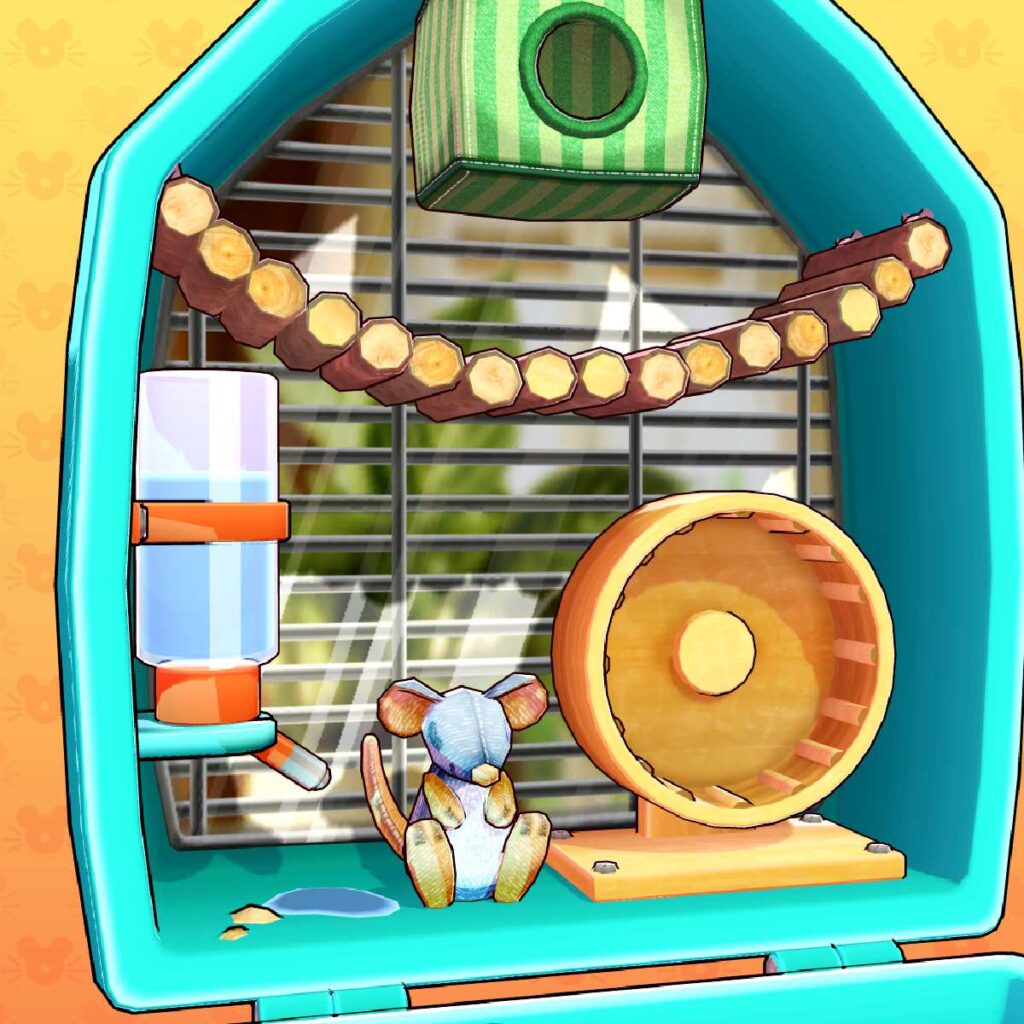
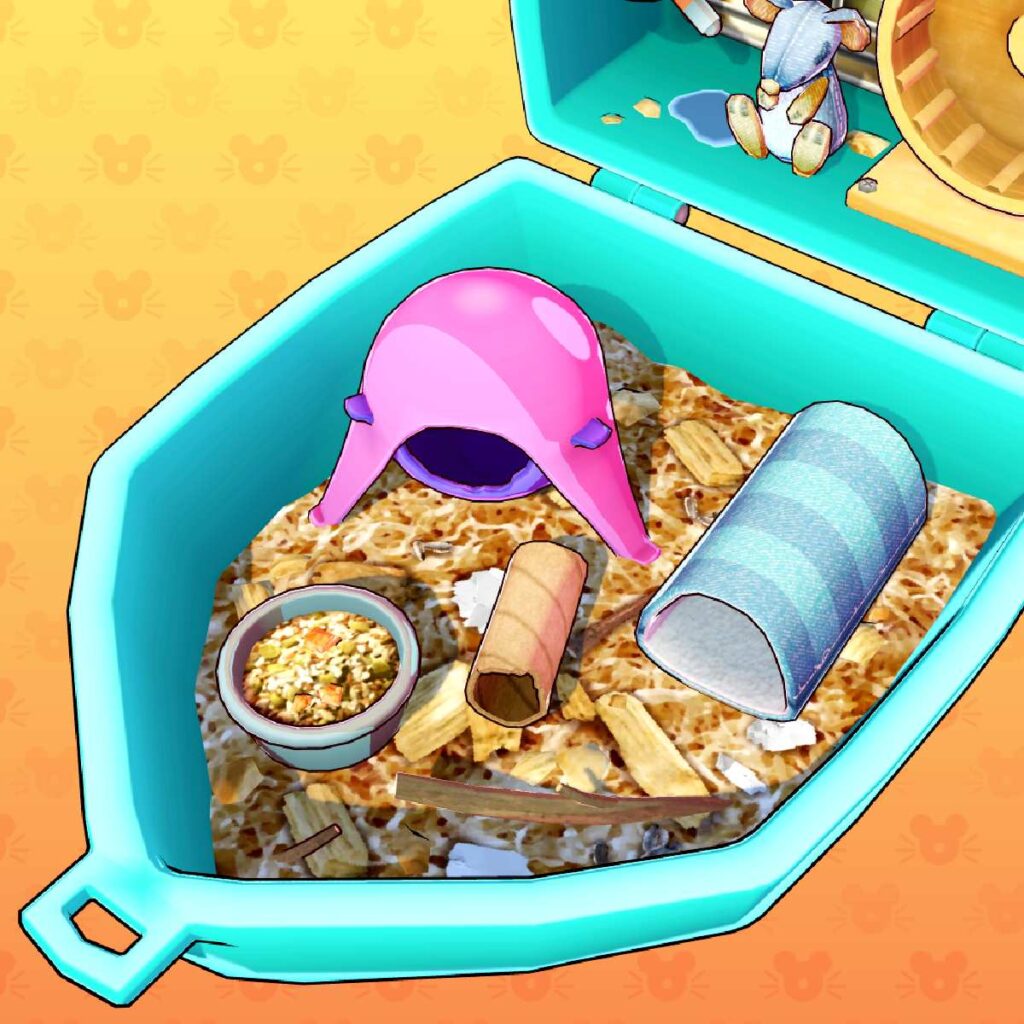
A few weeks ago I shared a project I made in Godot called Ratty Pocket! It's a simple web viewer for a 3D toy you can interact with by clicking on different items in the scene. You can play it on my Itch.io page:
This project was an excuse for me to try to build something else in Godot. I eventually want to make a full switch to Godot in the future, so I'm exploring different areas to get more comfortable with it. In march, I made a quiz game for the Low Poly Rat Jam using Godot, the focus was entirely on UI and buttons, this time I wanted to explore a part I didn't look much into: 3D, lighting, materials and shaders!
While I was at it, I also took it as a challenge to finally learn Blender and find a Photoshop alternative I could stick to. I plan to switch my main PC machine to Linux before the end of the year so that's something that's been on my mind a lot. So yeah, learning how to use these softwares made this project longer to finish but I did it! I wanted to use this post to just ramble about what I did, what I would do differently, and a breakdown for a couple of stuff I find interesting.
Shout-out to ProtoWLF who gave me incredible tips for Blender!
Summary:
3D Model
The design comes from a Rattober drawing I made in 2024 where I drew a Rodent-inspired Polly Pocket art. I still love the design and thought it would make a base to test toon shaders in Godot.
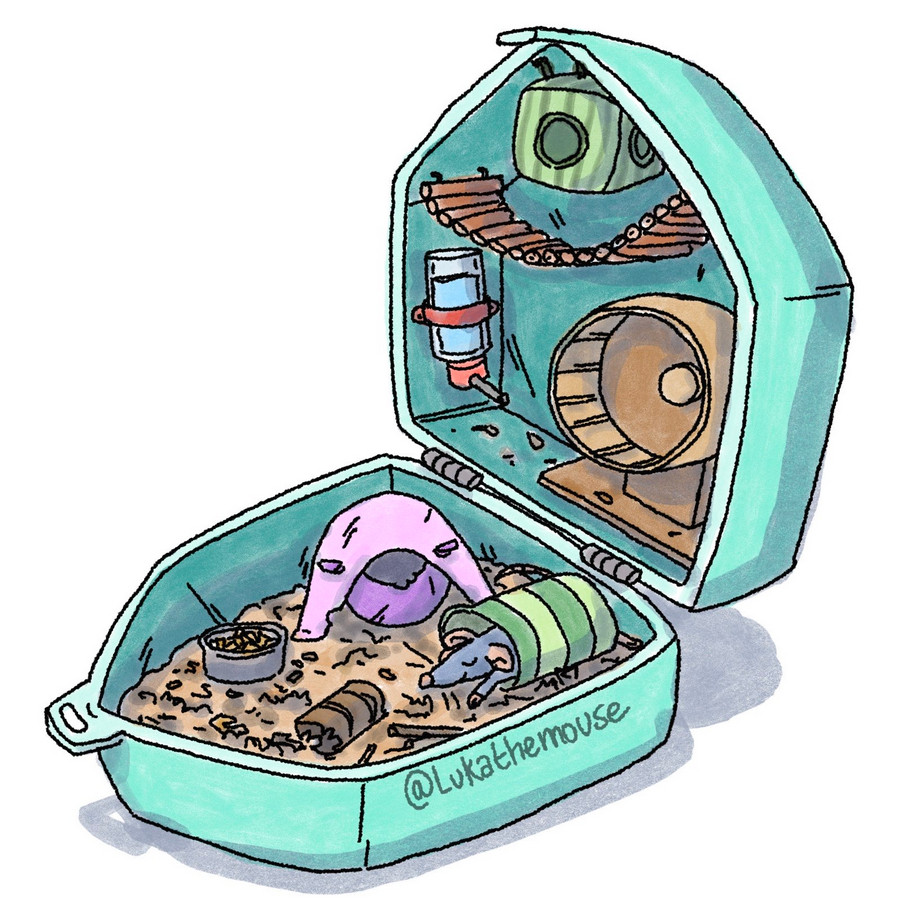
The shapes are also simple enough, it's was a great way to learn Blender.
I knew from the start that I wanted to have interactions with the various toys present in the Ratty Pocket shell: the wheel, bottle, bridge, various hides, etc. I also wanted to be able to open and close the shell. In Blender I parented all the items located in the top part of the shell to the shell itself, so they would be rotating with the top part of the shell, but in indsight I shouldn't have done that... I'm too used of having FBXs in Unity that I can unpack and change hierarchy on the fly, it's a bad habit to have.
I don't think that's something you can do in Godot with FBX files (or if it's possible, I'm not aware of it), in any case, it wasn't ideal for this project.
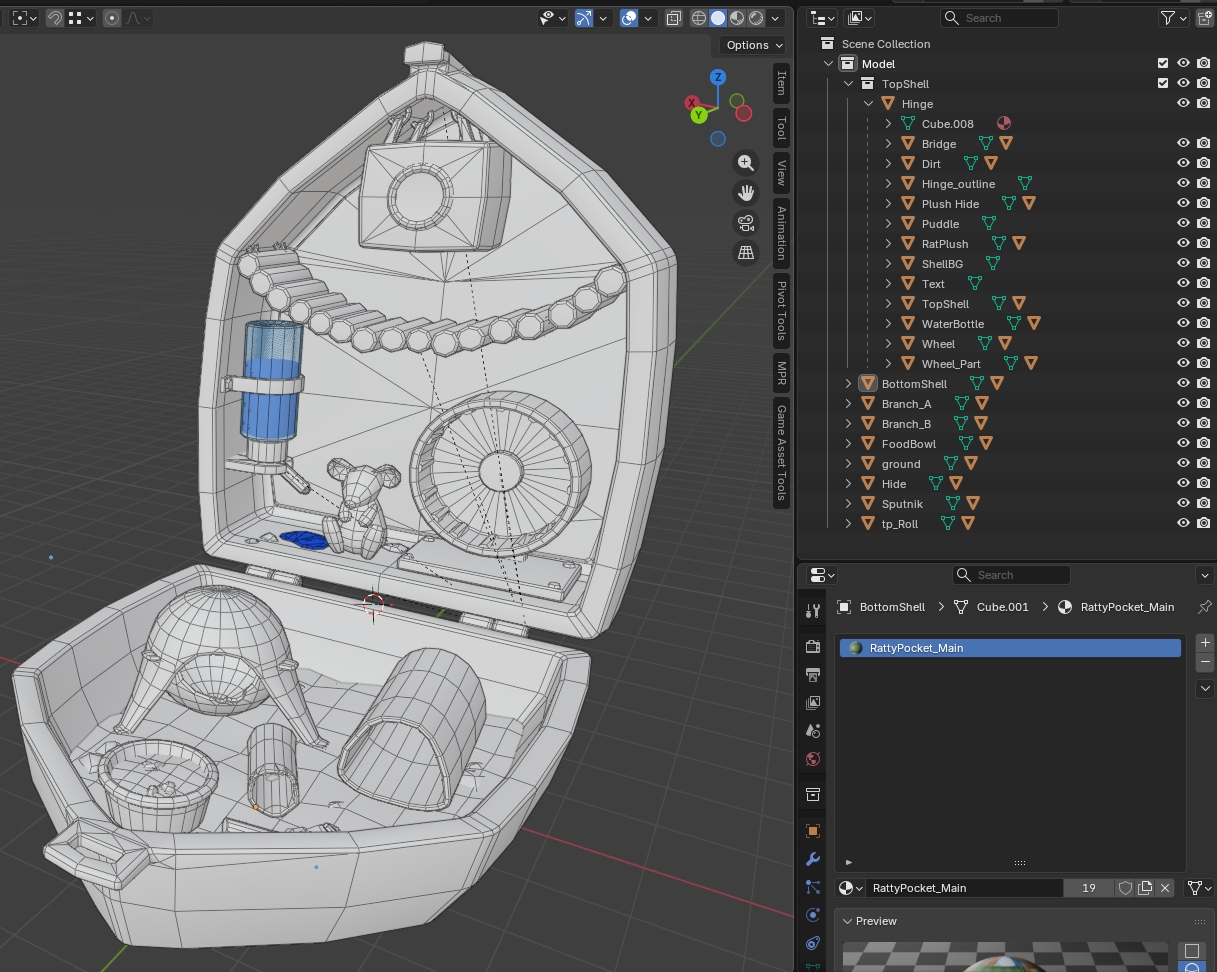
The Ratty Pocket model in blender, showing the hierarchy on the right.
The animations I planned for each interaction were quite simple: scale 3D meshes upon clicking on them, except for a few cases like the bridge, wheel and hanging hide box at the top. I placed their pivot point accordingly to the type of animation I would need.
I placed the pivot where I needed rotate the parts to animate the wheel, pivots didn't matter for the brige and hanging hide box. The rest of the items have centered bottom pivot because I planned to use simple transform animations.
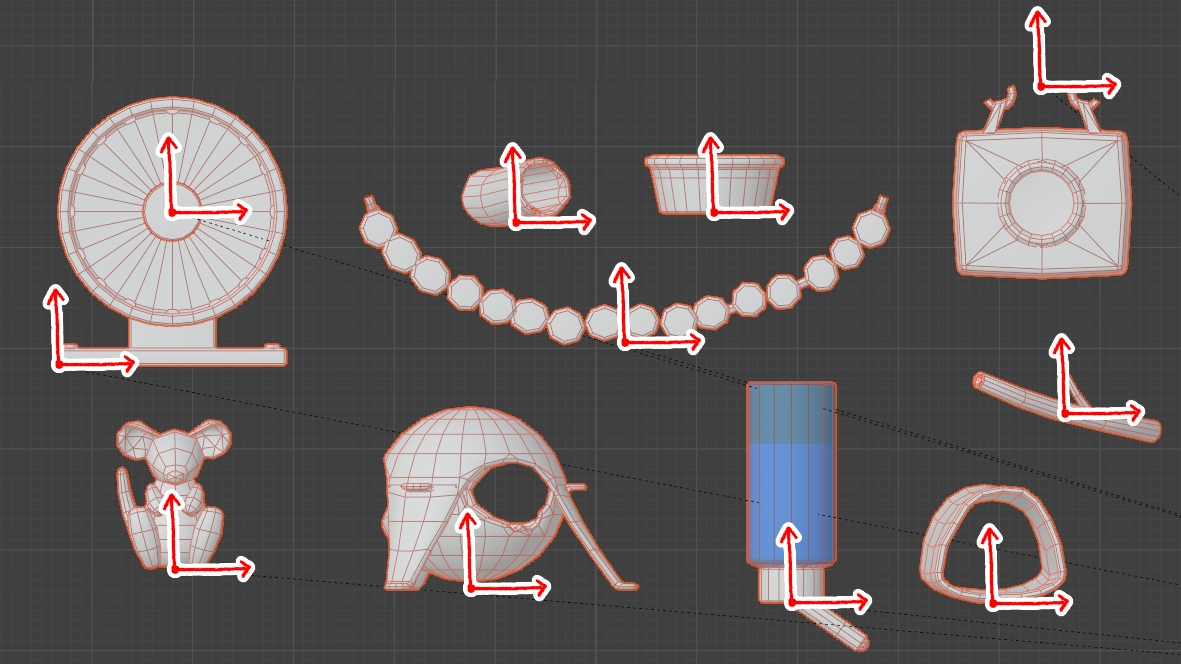
Just showing where each pivot are located.
I exported all of my meshes in one FBX, a format I used out of habit. I know there are other formats that are more fitting for Godot, I'll try glTF next time. The import part was important to understand how to avoid issues everytime I re-exported my model in-engine to make modifications: since it's a collection of meshes exported in one FBX file, not having the proper import settings can cause issue if you modify the name, pivot, material IDs, etc. No matter how you export your 3D models, it's a good practice to look at import settings.
To modify a 3D model import settings you can enable the Import tab by opening the Editor menu at the top left of Godot, selecting the Editor Docks and then Import.
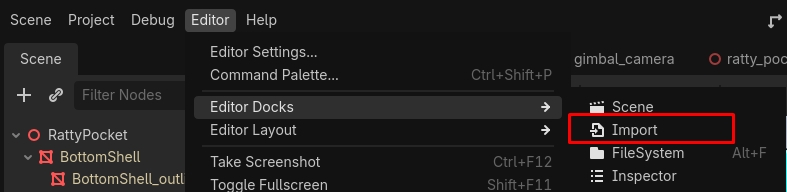
Took me a while to know it was there.
The import tab had a bunch of good options like the ability to generate LODs, import animations, etc. The advanced button at the bottom of the tab will bring you to a more complete import menu. You can also double click on a FBX and this window will open:
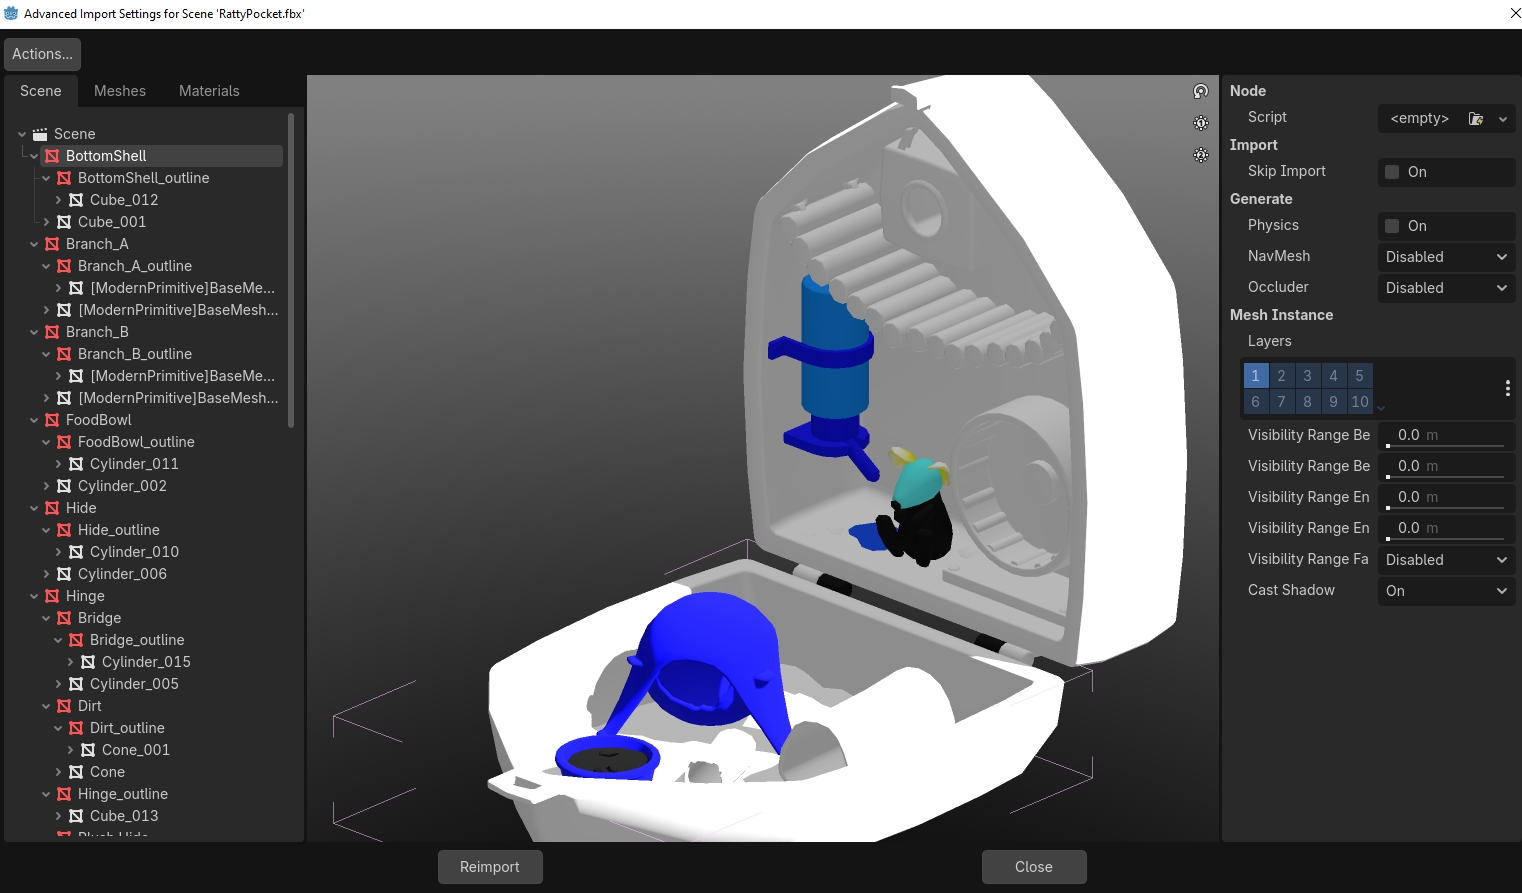
The viewport will be showing vertex color and/or different materials
There are 3 tabs where you can modify import settings seperately for each object in your 3D mesh, but the one I want to talk about is the material tab. You can link the material IDs from your 3D model to materials present in your projects, I emabled the "use external"
option and selected the corresponding material in my project directory.
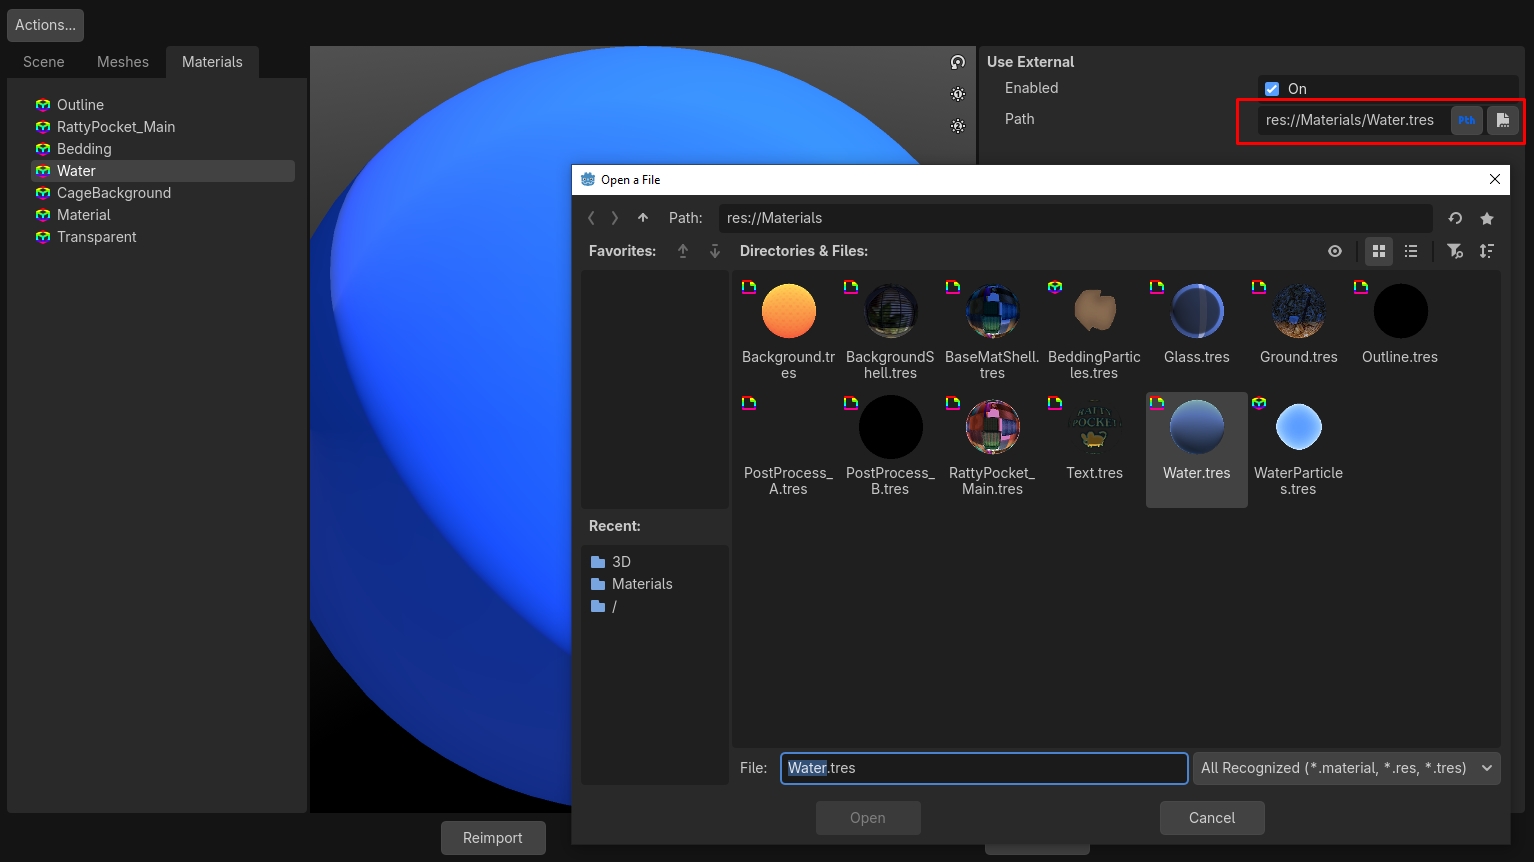
The Scene and Meshes tab are useful to do fine tuning import options on specific parts of a mesh.
These options are important as it ensures you don't have to replace each of your imported material by hand with pre-existing materials in your project. I haven't tried the option yet but you can set a preset for the import options, could be handy in projects like Squeakross where I have a whole bunch of furniture sharing the same import options.
After making changes and hitting that reimport button, you can also save your model as a scene by right-clicking on your FBX model in the project files and selecting "New Inherited Scene". If you don't do that you won't be able to open your FBX file as it is not a scene and Godot cannot allow you to modify it. It's not mandatory to do so, but in my case I needed to make a scene with my 3D mesh as I planned to add animations and scripts to it.
This workflow allows you to export your models as many times as you wish without having to deal with something being broken each time you re-import it. You can find all the info in the Godot Documentation about import configurations. I really wanted to talk about importing 3D models because I didn't find a lot of tutorials on how to do it properly in Godot (aside from the documentation of course).
Shaders and Materials
One thing I really wanted to have a look at with this project was the VisualShaders editor in Godot, especially for 3D shaders! I was curious of how much I could do with it and how much of my knowledge of Amplify Studio (node-based visual shader plugin for Unity) would be transferrable. I'm glad to say that I was pleasantly surprised at how fast and great it was to use!
The documentation for VisualShaders was a bit scarce in my opinion, but I feel like it's to be expected since their focus seems to be more on written shaders. I recommend reading both if you have no idea how shader works because it's still a lot of concepts to grasp. I personally choose to make shaders using a node-based interface because it feels easier to use for me after years of using Substance Designer, I also do not come from a programming background so it helps to have a visualisation of what I'm doing.
I ended up making a couple of shaders for my project, as I had much fun working on them:
- Main general shader for all the 3D models
- Transparent cutout shader for the "Ratty Pocket" text on the shell
- Transparent glass for the water bottle
- Background gradient and tile
- Black unlit outline
The main shader is the most complicated one, I'll try to explain as much as I can and adding screenshots to go along my explanations.
Unlike Amplify Shader or Unity's Shader Graph, Godot's VisualShaders is split in 3 views: Vertex, Fragment and Light. I won't go too much into explainations but the Vertex view allows you to modify vertex data, Fragment affect pixels, and Light affects the rendering of your model. You can find all the info on the Godot Documentation about Spacial Shaders.
Most of my work on the main shader was done in the Light view, Fragment only has the texture assigned to the albedo output.
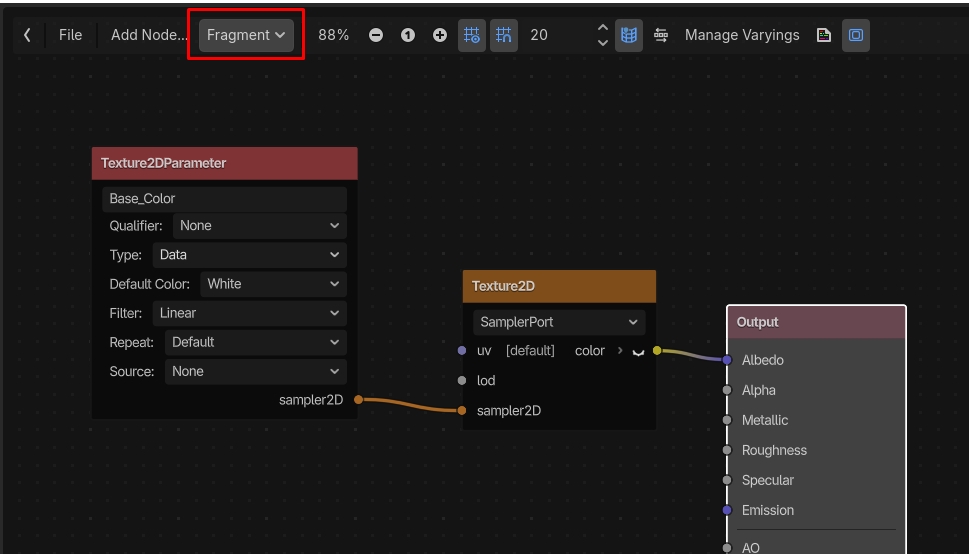
Highlighting the dropdown list where Vertex, Fragment and Light are located because it took me a while to find it.
I wanted a couple of different features on the shader:
- global fresnel
- colored shadow
- rim light
- specular dot (for plastic objects)
Since many of these features required me to access lighting data, most of my shader work was spent in the Light view. I won't explain all the nodes of each part of the graph but I'll try to describe what it does to the best I can.
This part is where I made the colored shadow and global fresnel (I'll post a big image showing the whole shader at the end):
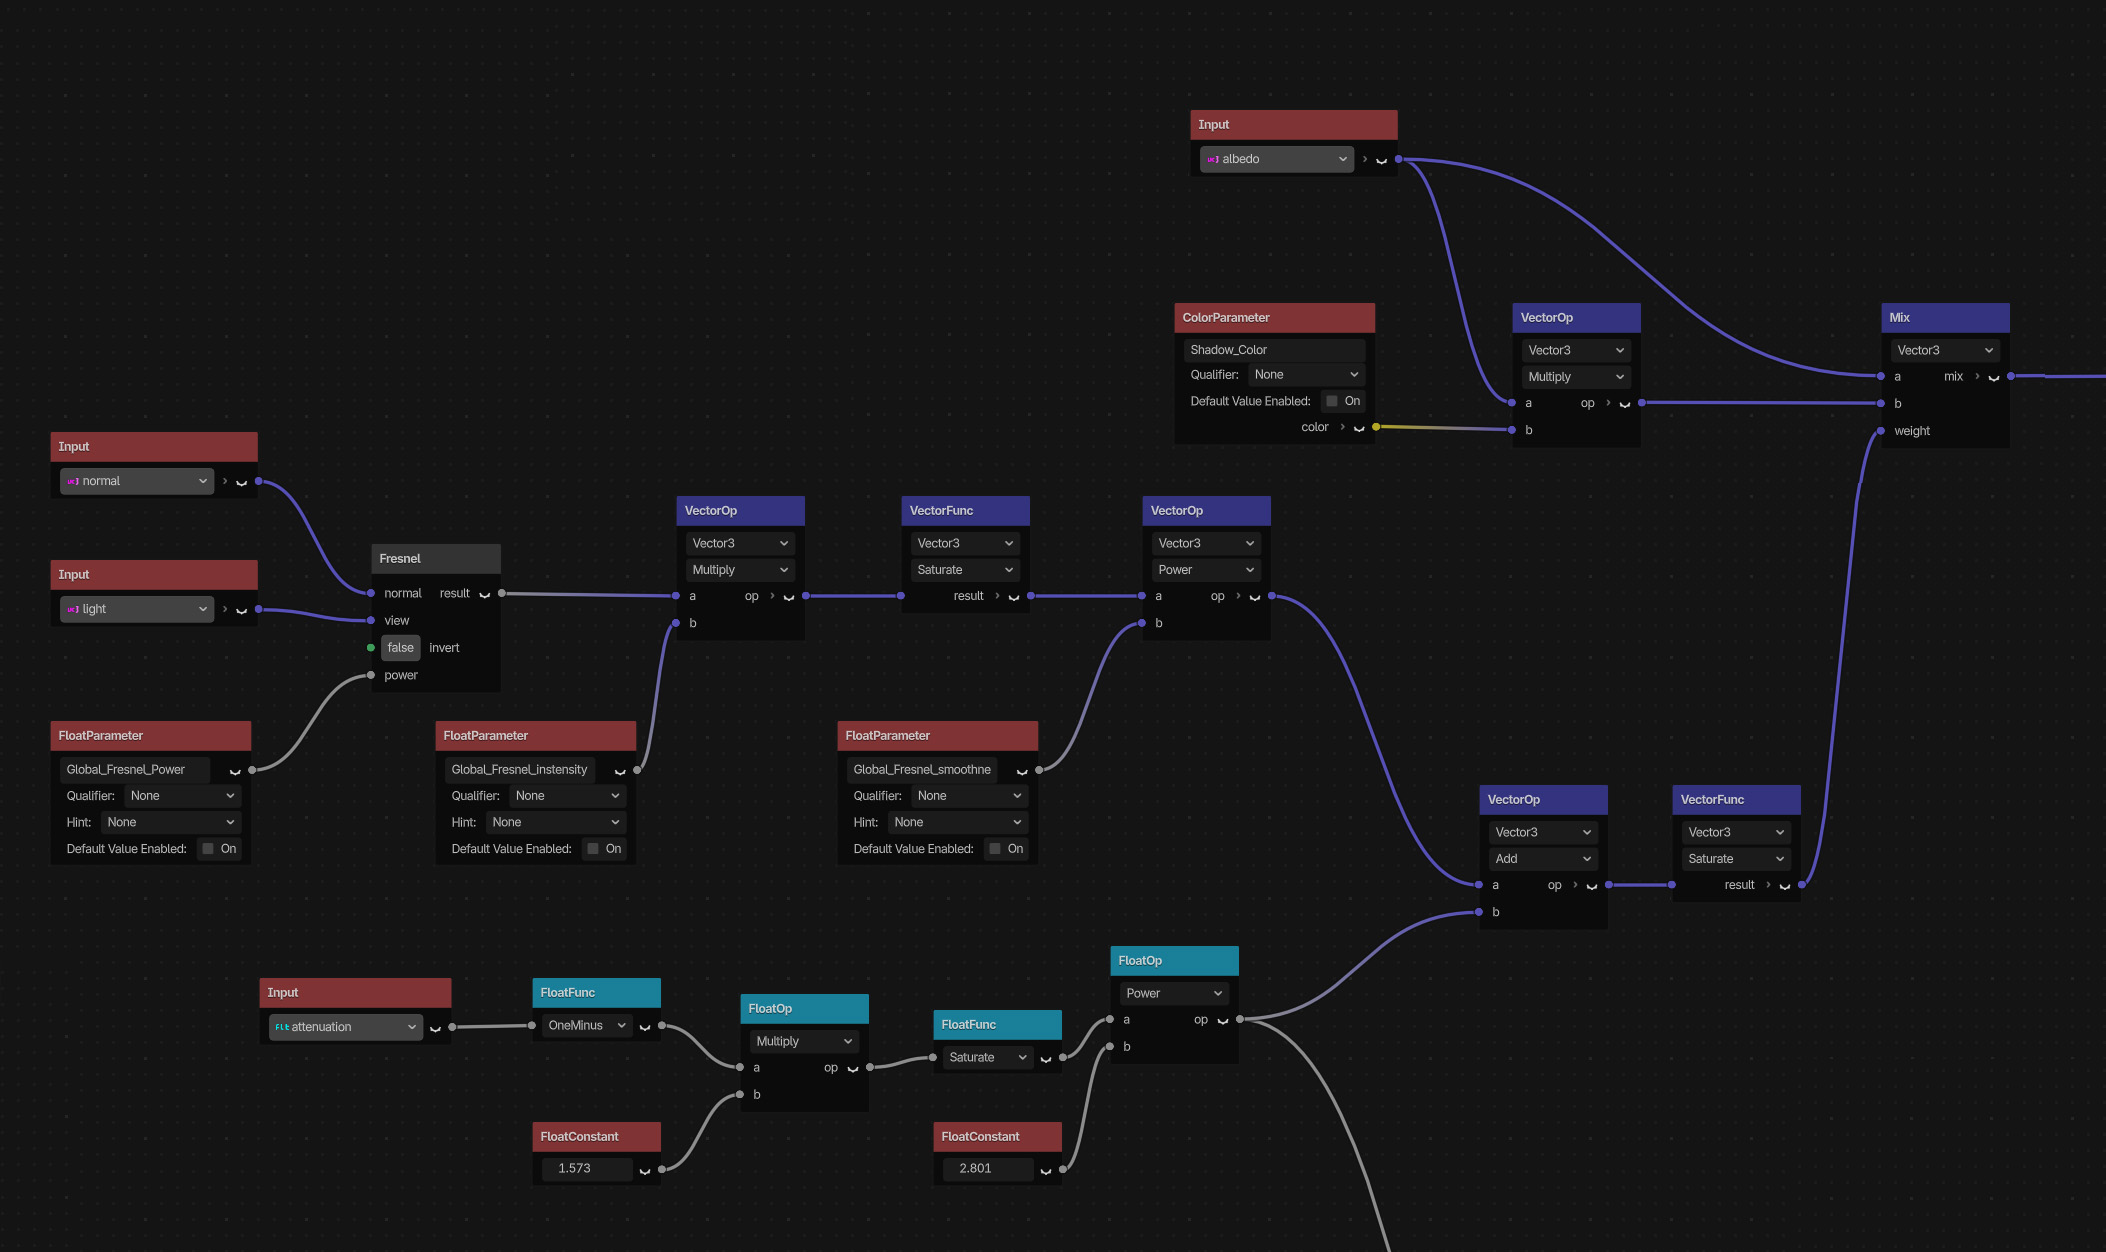
The image should be high quality enough to click and zoom in to see each node in detail.
For the main fresnel I choose to use the directional light Light input as view direction, instead of camera view direction. I wanted the fresnel to be part of the shadows and not move with the camera like most toon shaders do. I used the Attenuation Input to get the shadow information, then added a Multiply and Power after the Attenuation to make the shadow more or less intense and match the result I want. Both the fresnel and shadow are added together to make a mask to use in the last node on the right: a Mix. Mix is a lerp (Linear interpolation), here is has two inputs A and B. the third input, Weight, is a value that will output either A or B depending on the Weight value. 0 or less will output A, 1 or more will output B. That allows me to darken the base color (input A) with a shadow color (input B) using that mask as Weight input.
You can see I used the albedo from the Fragment view as a ParameterRef, since I'm customizing the Light processor function of the shader I need to recreate the lighting myself to match the style I want for the shader.
Moving on, the next part is the rim light:
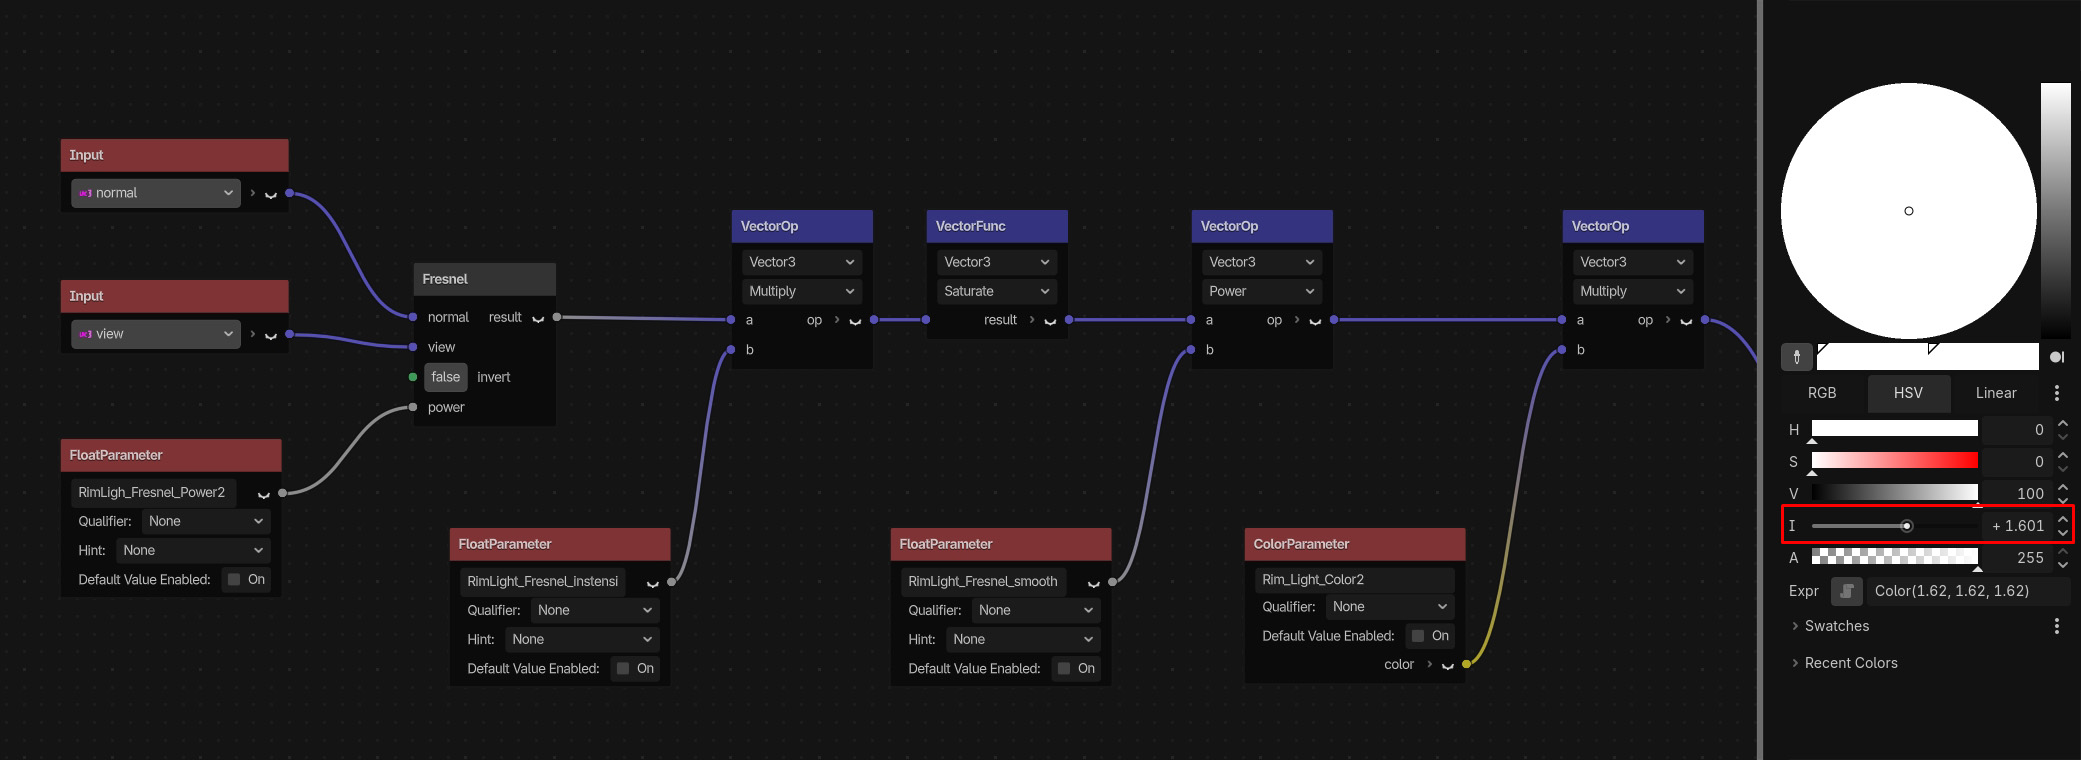
This time it's using the View direction instead of the directional light.
This part is quite self explanatory, just a basic fresnel, multiplied by a color at the end, you can boost the intensity to make it pop more.
Next and last part is the specular dot:
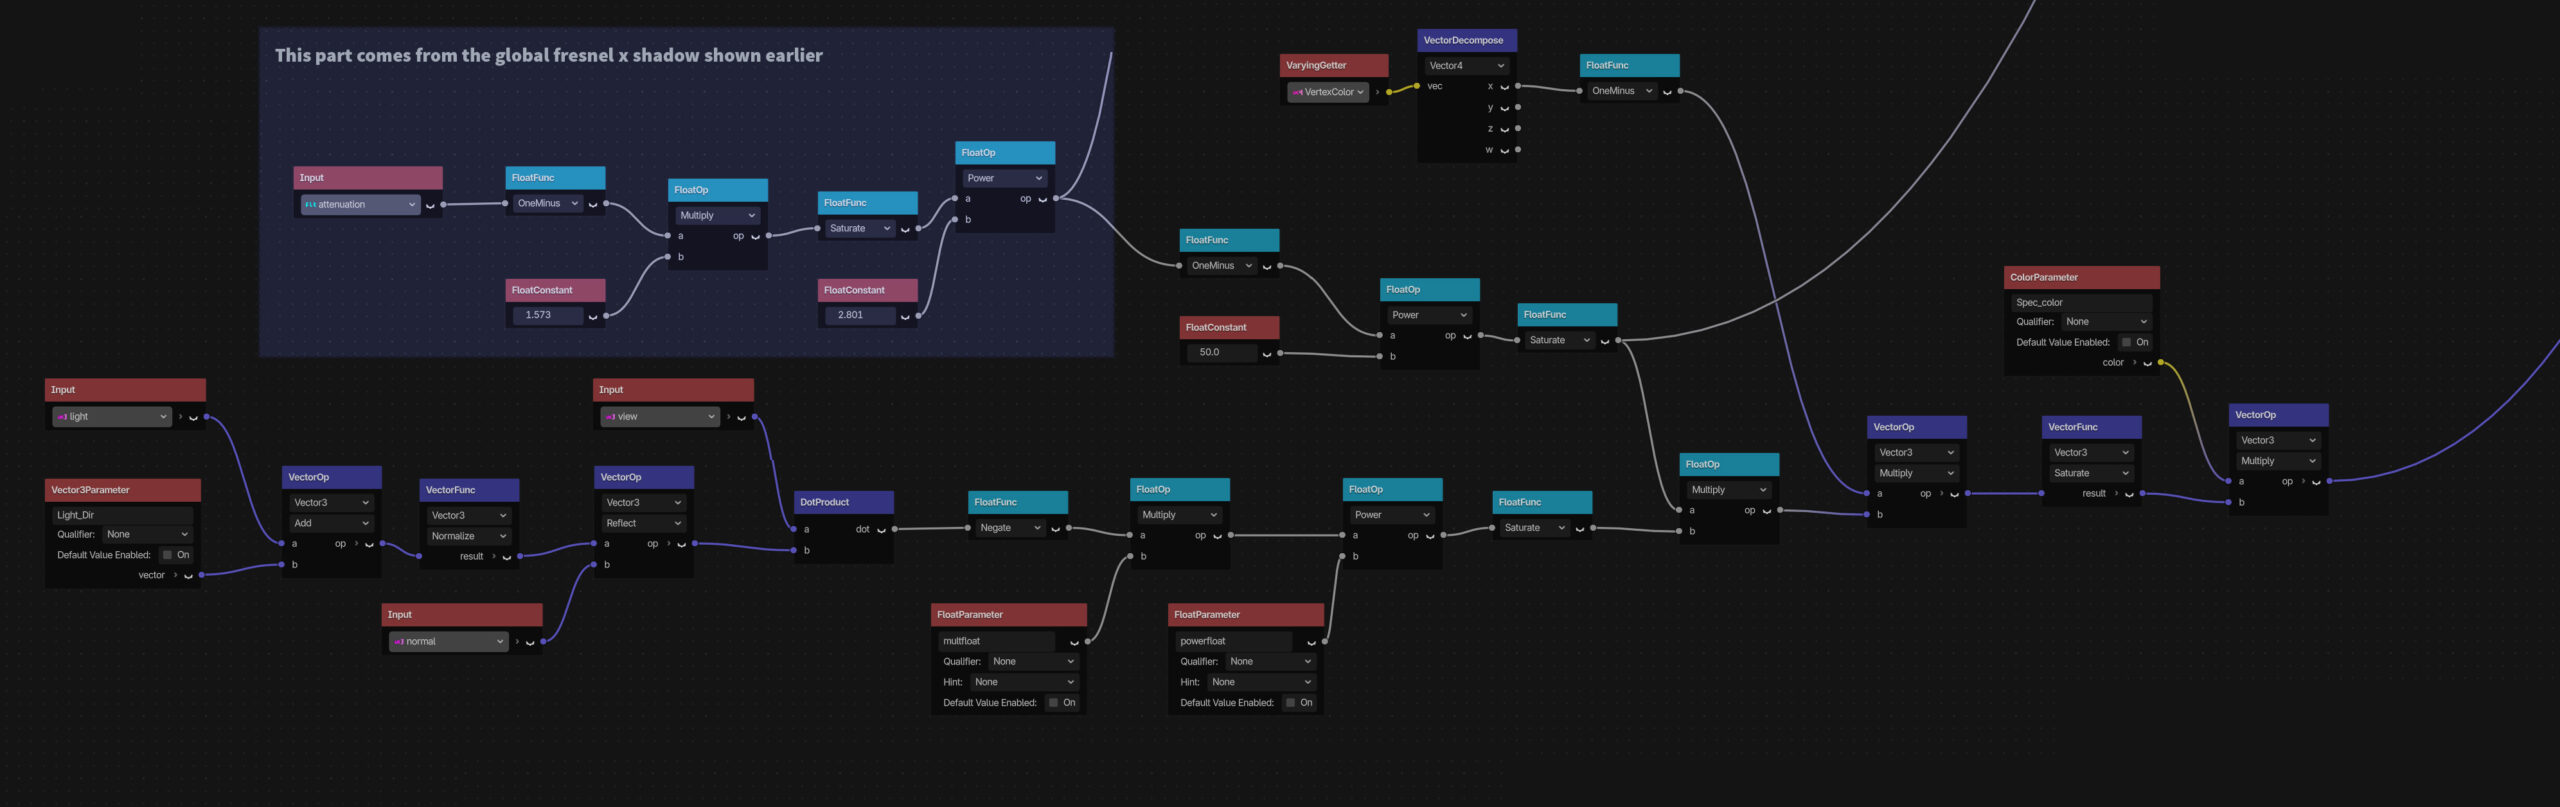
It looks scary but it's just math.
From left to right: I am adding the Light direction to a Vector3Parameter, to be able to move values around to position the specular spot in another location. I used the Reflect node to create a vector from the Light direction, and a DotProduct to get the specular spot position on the geometry by comparing the View direction and specular spot Vector3's. The Multiply and Power nodes are there to modify the size and smoothness of the specular spot.
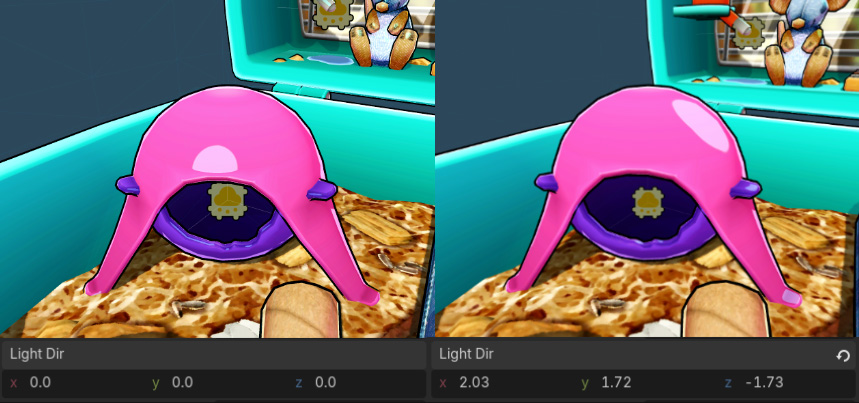
Showing the difference altering or not the light direction with the custom Light Dir Vector3.
After the Saturate node, I Multiply the inverted shadow mask: I don't want the specular spot to appear in the shadows. I'm using a multiply to also erase the specular spot so it appears only on 3D meshes that have blue vertex color applied. Since this spot is for plastic material I don't want it to affect all the objects.
Everything is added together in the end to make the final result. Here is the whole graph:
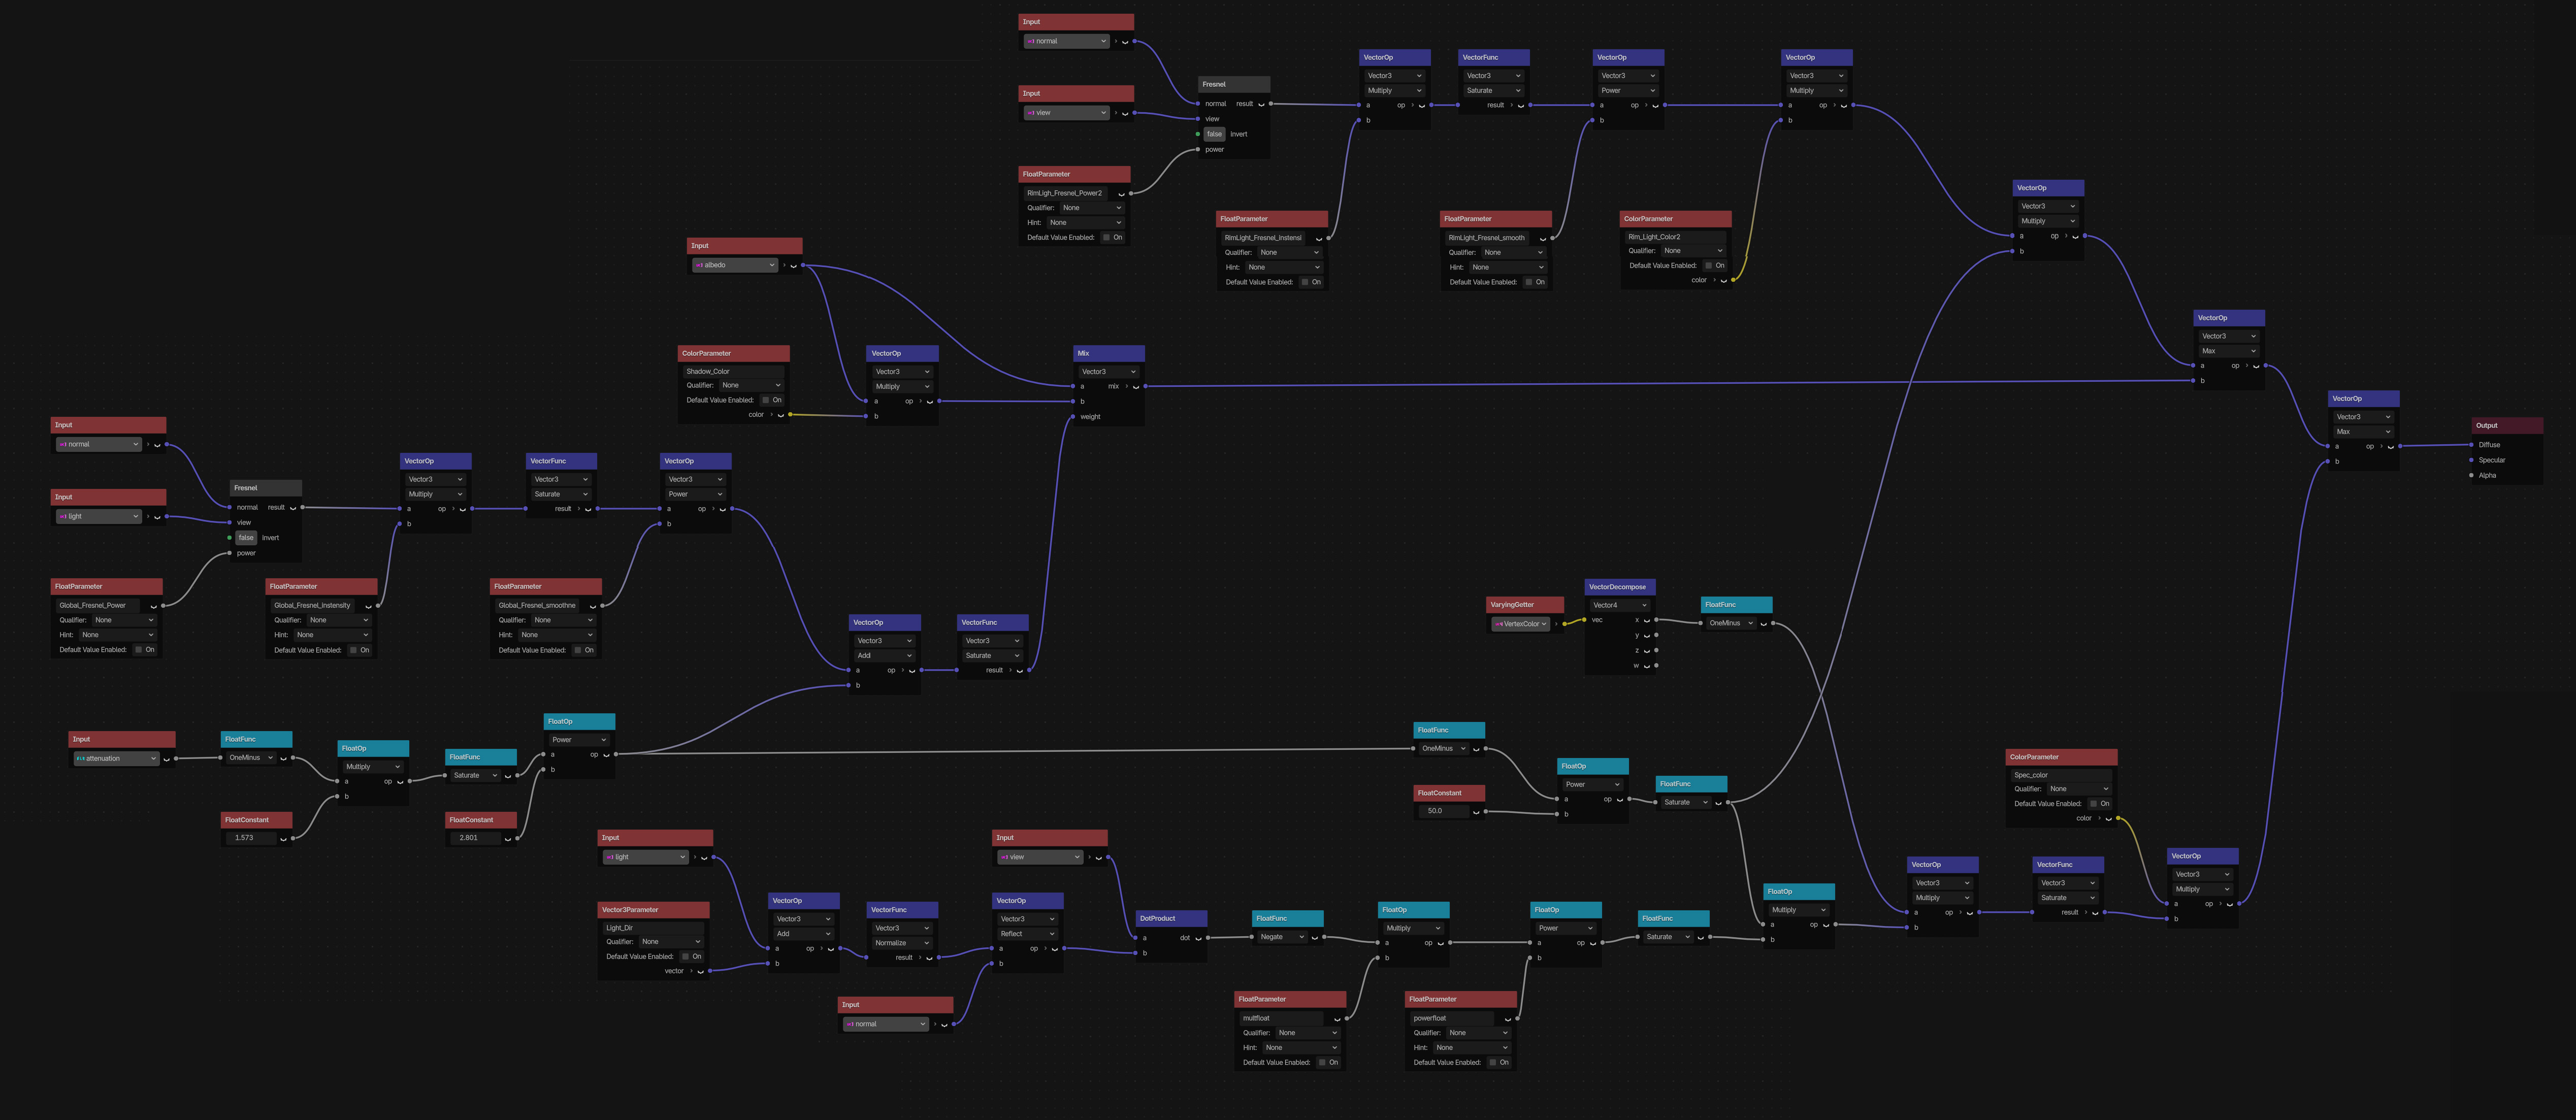
Right click and open image in new tab to view it at full resolution.
Small note to add that I had to assign the vertex color values in the Vertex view to a VaryingSetter to be able to use them in the Light view:
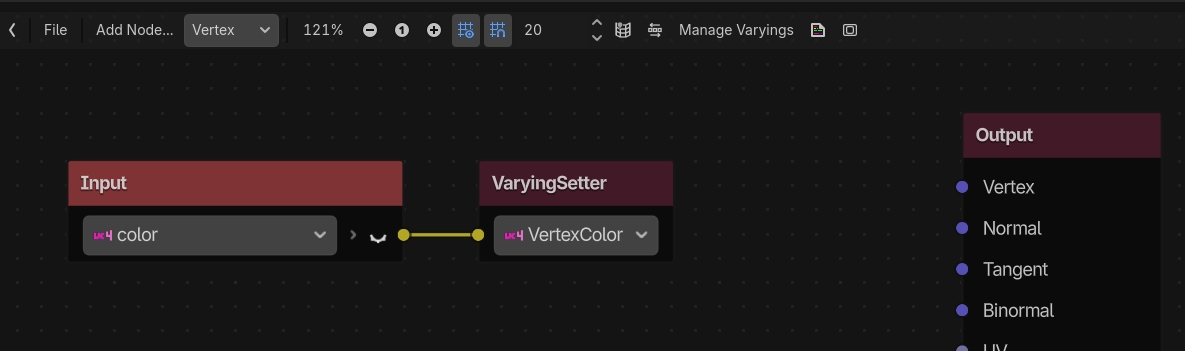
A small but important detail!
And here is how it looks in the end:
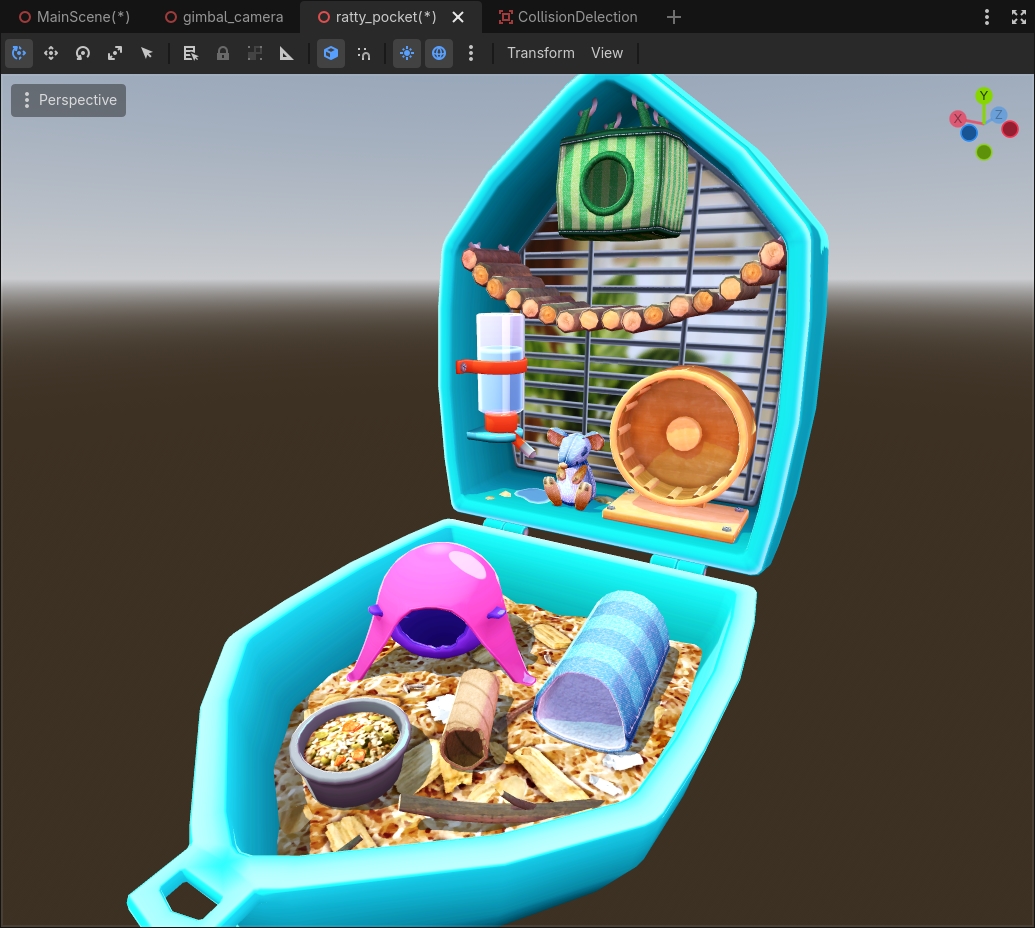
Showing the model without any outlines.
The glass shader for the water bottle reuses the same principle as the global shader: it has a global fresnel for the sides of the glass, and a vertical specular line that is made following the same logic as the specular spot.
For the outlines: I tried a couple of post-effects but didn't find any that looked like what I wanted. I decided to do a simple outline shader with vertex push. All my 3D models were duplicated in Blender and added as children of their corresponding model in the hierarchy. That way, when I animate an object, the outline will follow.
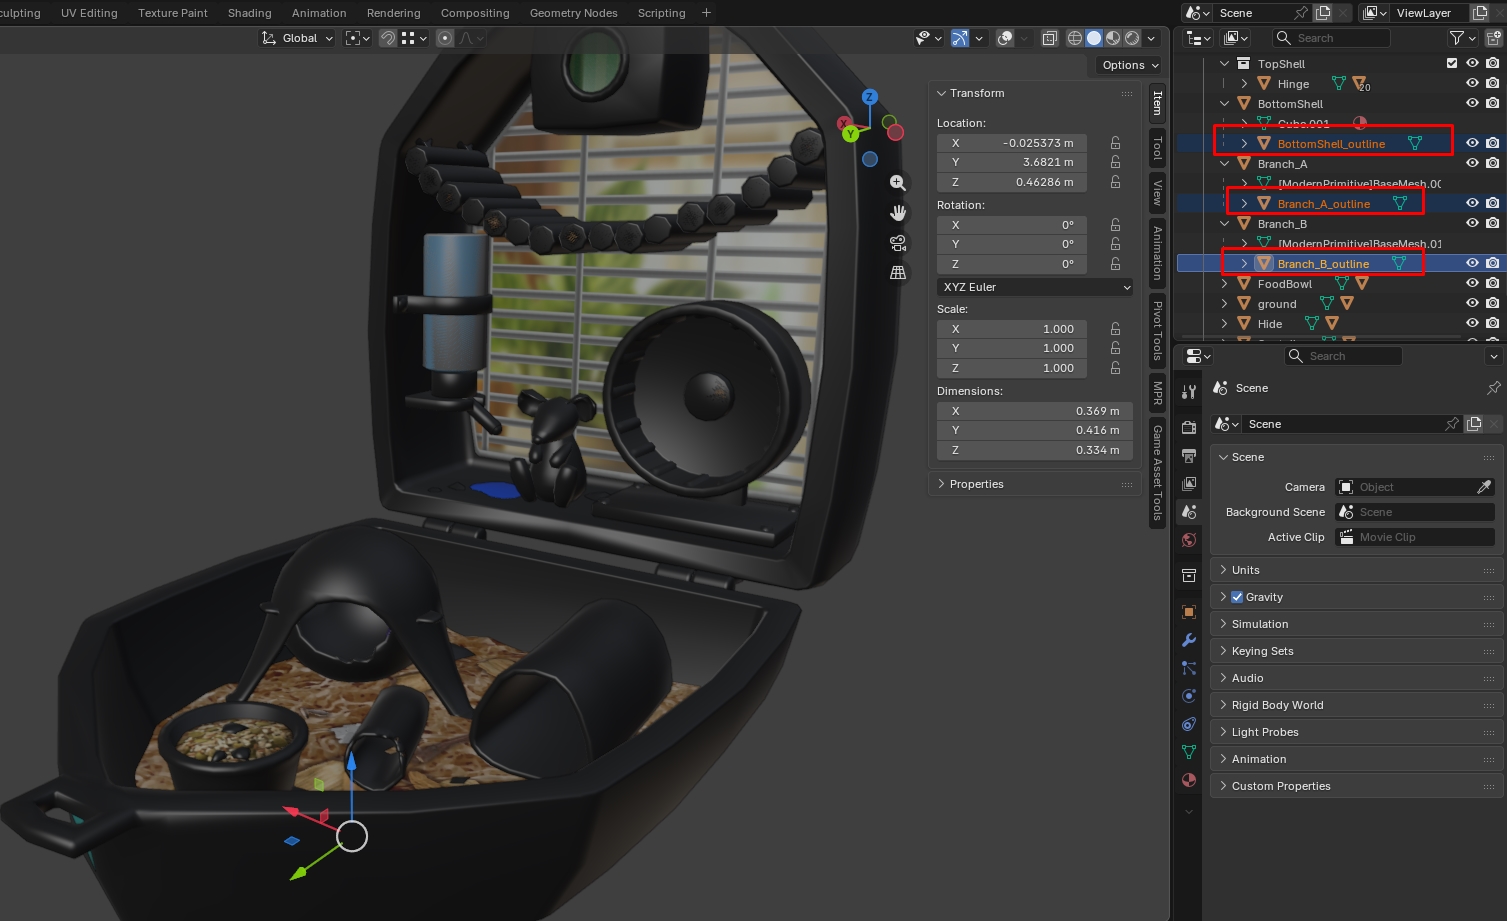
Just showing how it looks in blender, the normals are actually inverted already.
Here is the shader:
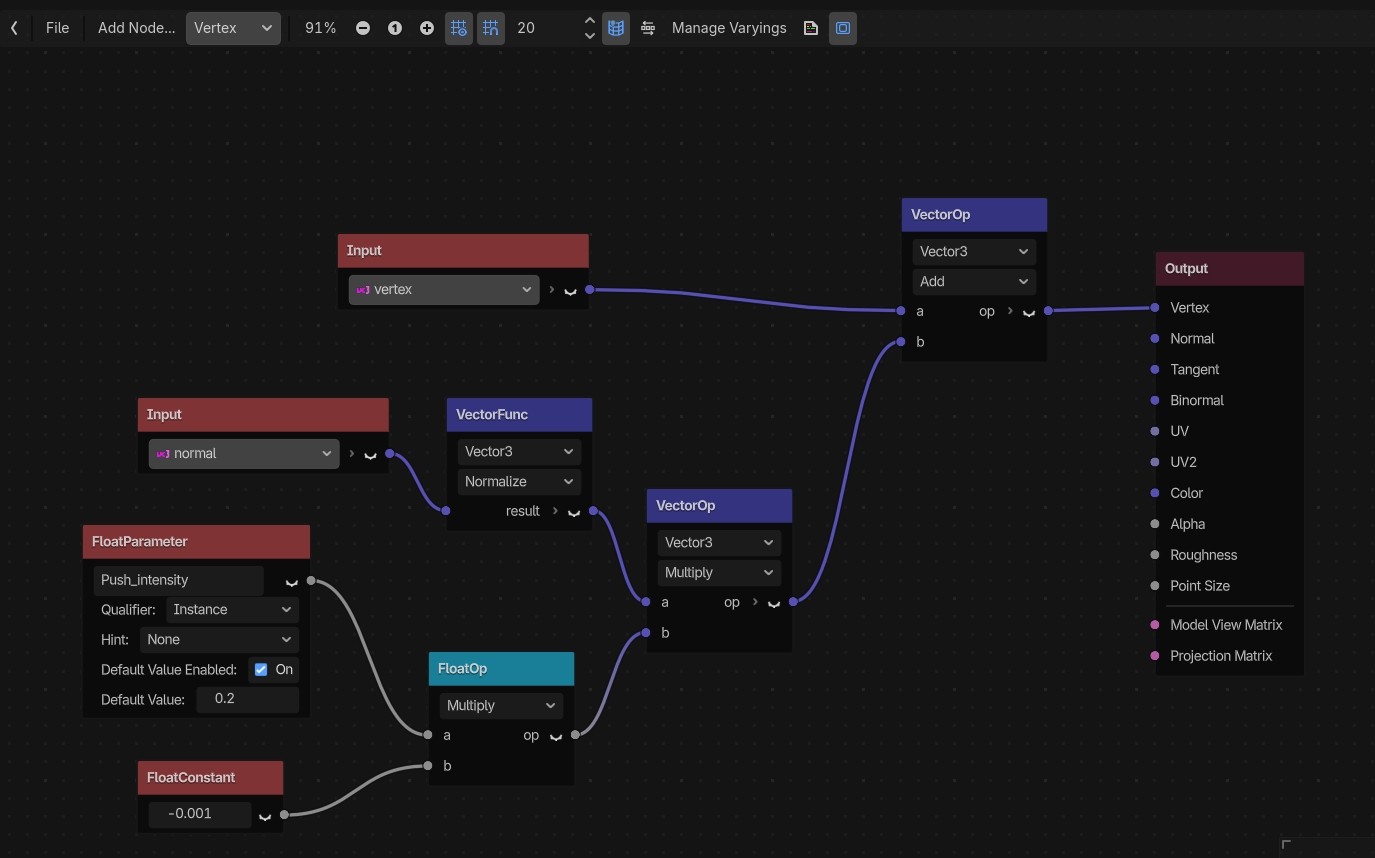
Showing the Vertex view.
The Fragment view only has a ColorParameter as the Albedo output. The parameter is set as instance since it'll will be modified by script, per object. The material is unshaded, has disabled shadows and ambient light.
One more shader before I continue: the tilable background shader. I didn't want to do a skybox shader or a UI canvas for it so I just made another 3D shader. In it I can control the texture tile, color, pan offset and speed.
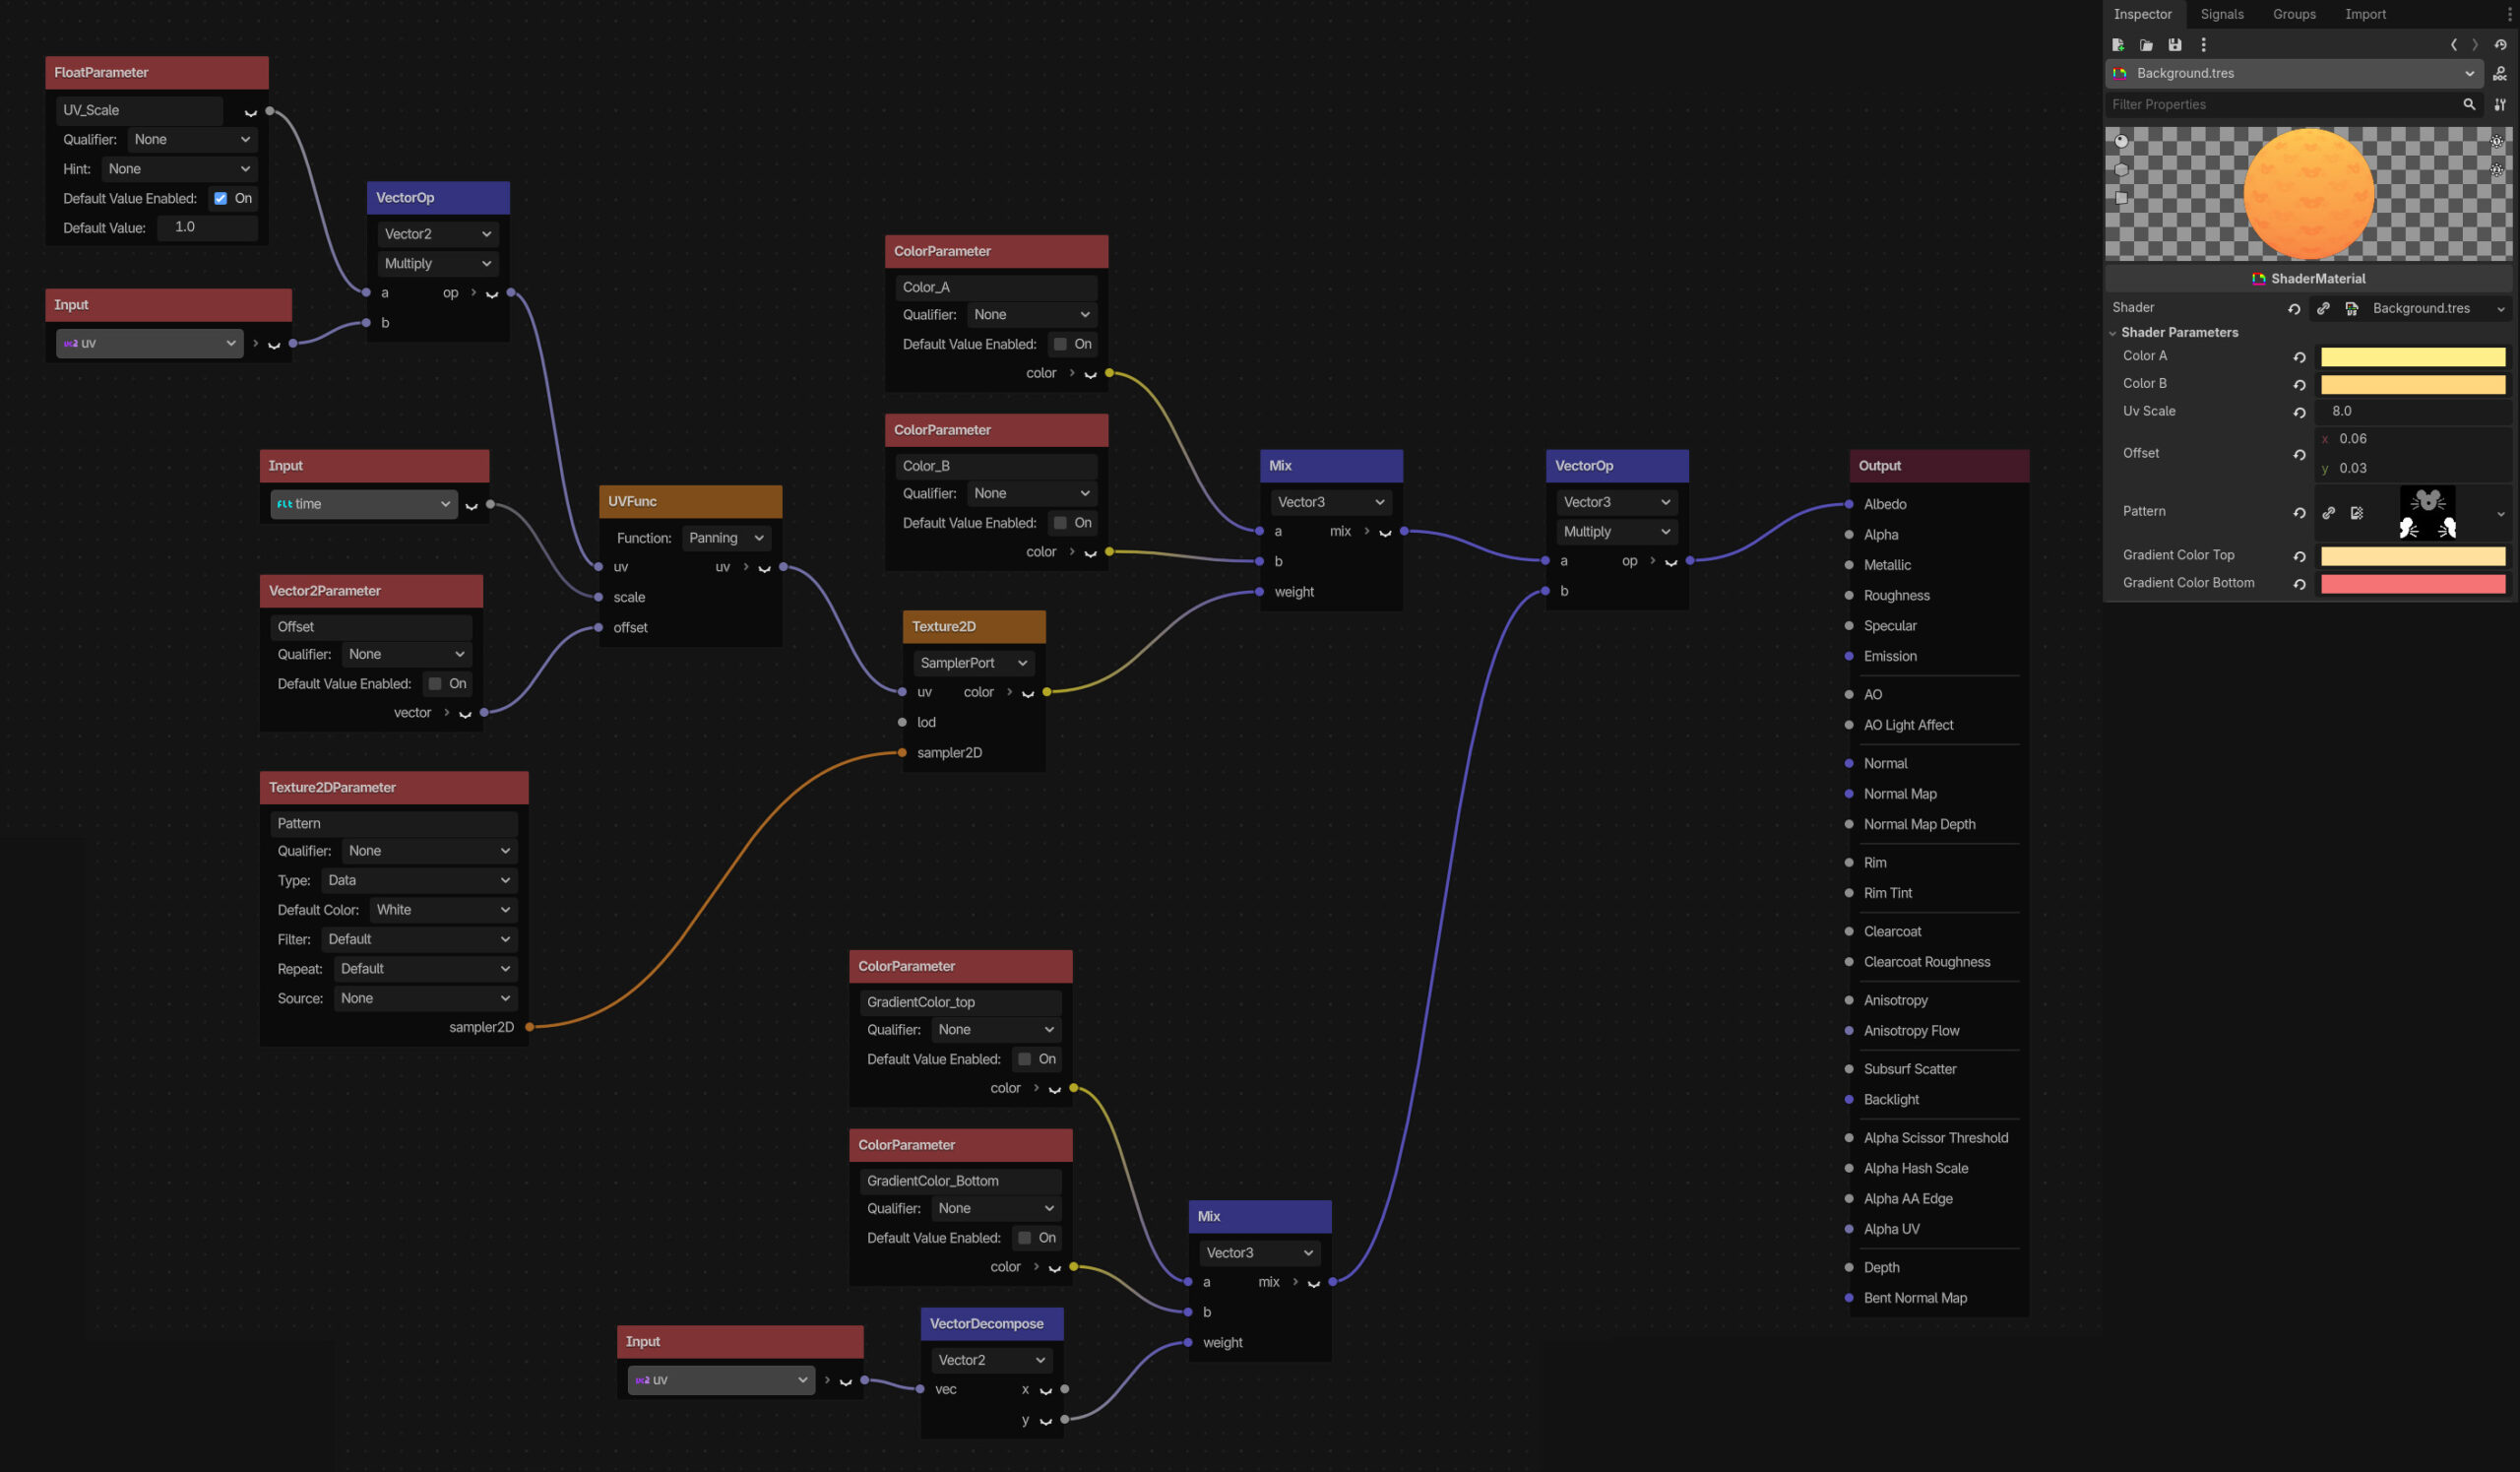
I just wanted to use a plane from Godot and don't export anything else.
I'm using the pattern as a mask to blend two colors to fill the pattern. Since I'm using a QuadMesh from Godot the UVs are mapped on the entire UV square, I'm using the UVs coordinates to generate a gradient from top to bottom to add more variations to the background (the 5 nodes located at the bottom of the graph).
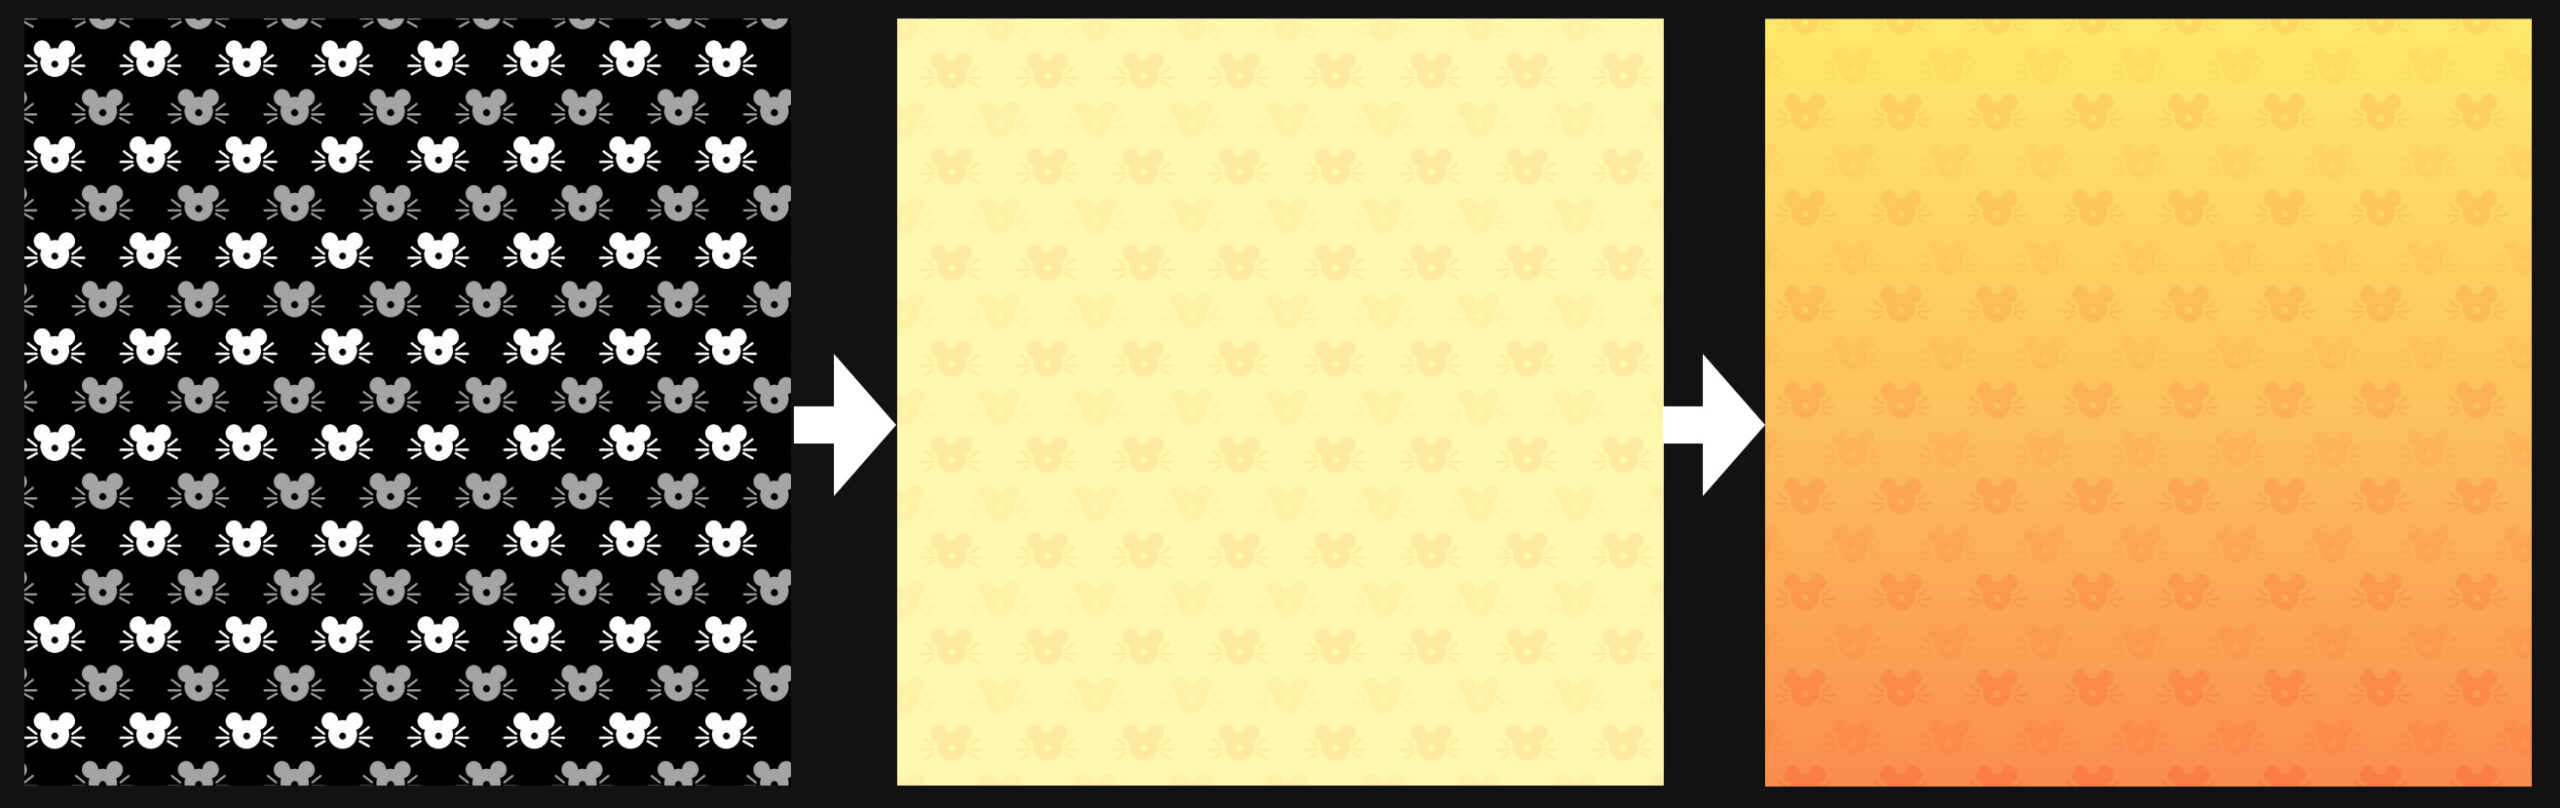
A small step by step.
I wanted to show a couple of other things shader-related but I feel like the blog post would be too long otherwise, so I'll keep them for a next project! I really enjoyed using Godot's VisualShaders editor, a lot of it was trial and errors, finding what would be the equivalent from Amplify Studio in Godot, etc. I ended up making lots of visual decisions because I wanted to try the system.
Animations
I didn't want to mess with bones, rigging/skinning with this project so I tried to keep all the animations simple to manage for me. I ended up having 3 types of animations:
- Tweens
- Animated shape keys
- In-engine animations
Most of the props worked with with a simple tween animation (shout-out to Christophe and his amazing Godot Tween guide) but a couple of objects required a bit more. I used Shape Keys for the wooden bridge and square plush hide, you can find more info about it in the Blender documentation.
It was quite simple to setup, I just made one key to a stretched pose and I would be able to animate it in Godot.
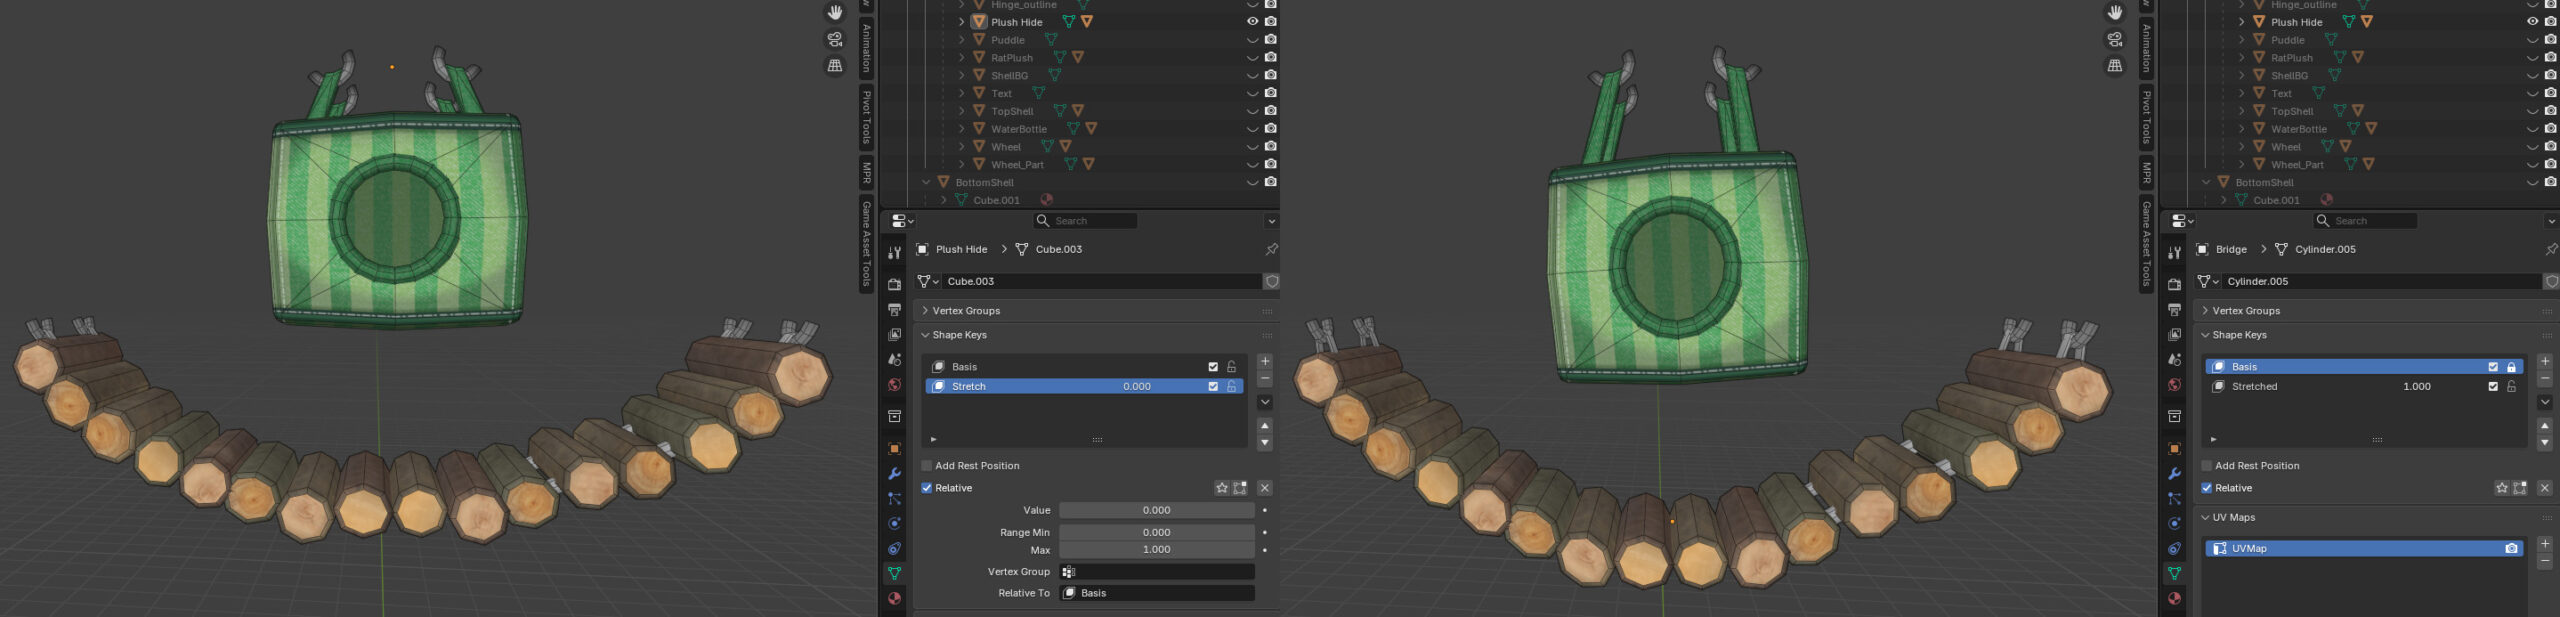
On the left the shape key value is 0 so my mesh looks normal, on the right the shape key value is 1 and the mesh is stretched. You can animate that value in Blender or Godot.
In Godot you can access the Shape Key in any animation by adding a Blend Shape track to it. You can then animate the value so it blends between your base state and any key you've created.
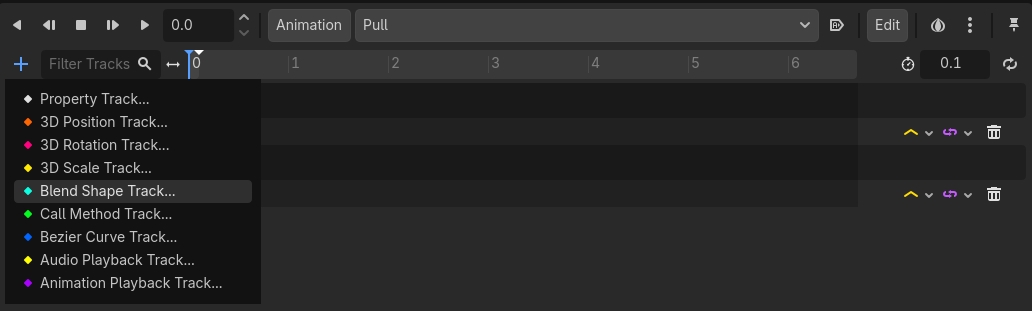
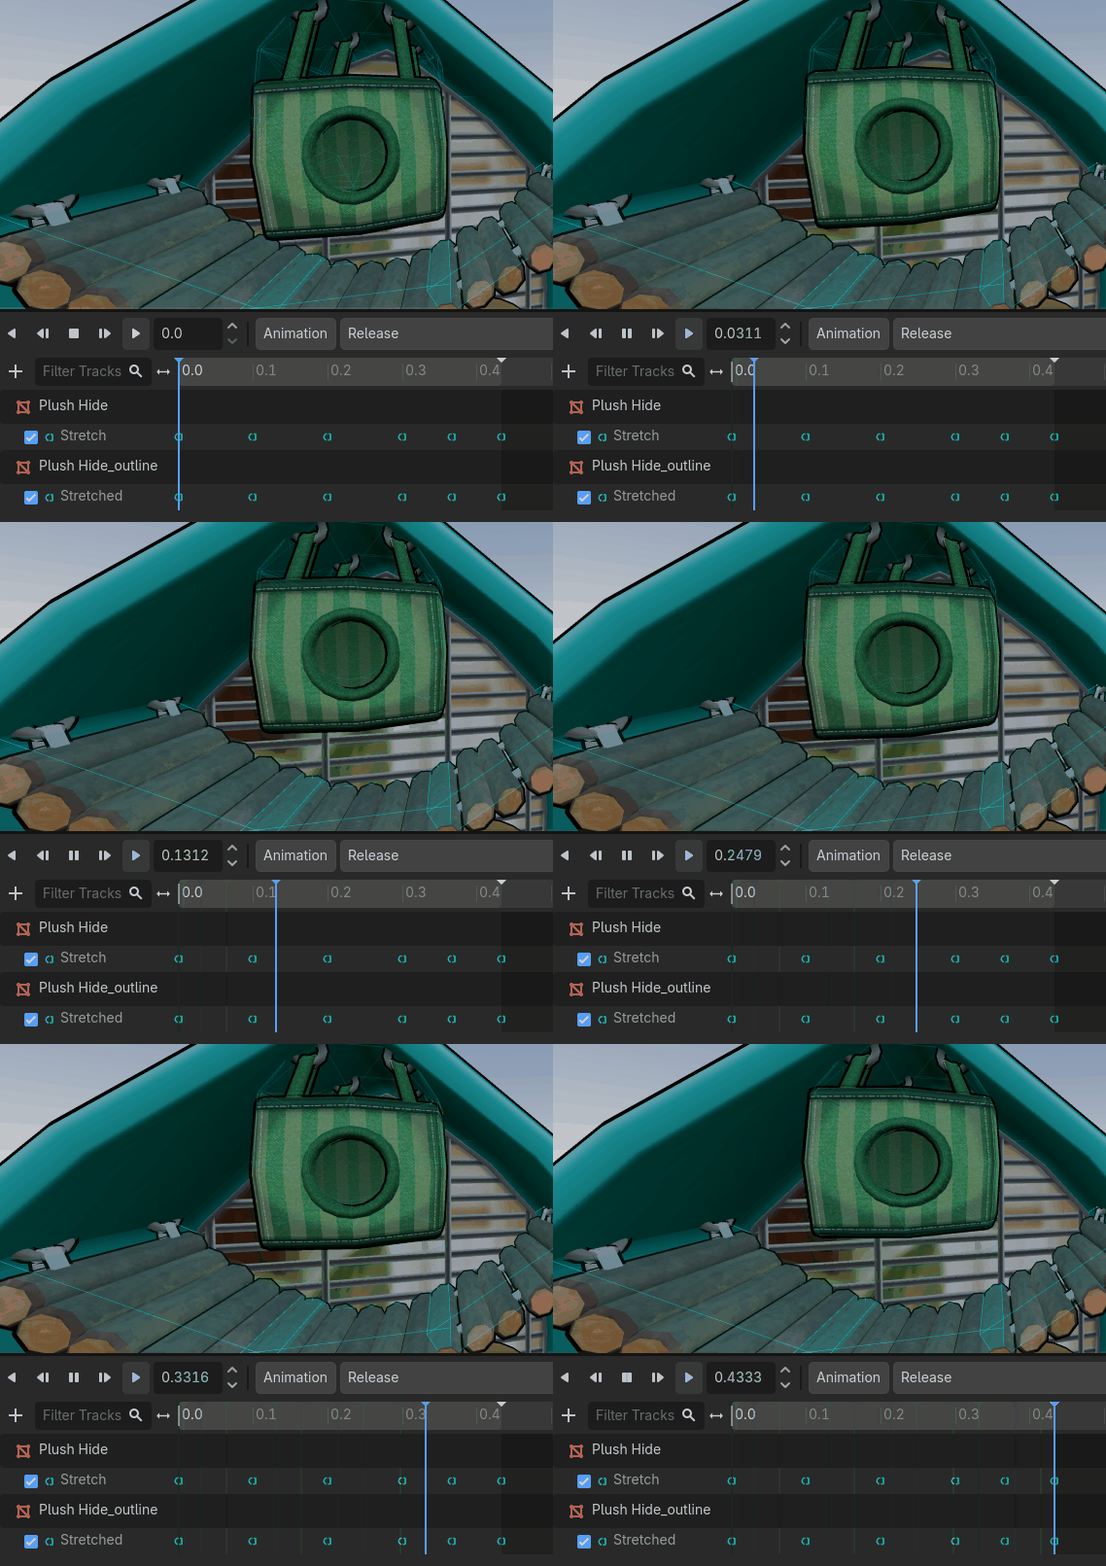
Boing Boing
I had to make the blend shapes and then duplicate the 3D mesh for the outlines so it had the same values. It was a bit convoluted to do it that way, there is probably a better way to do it... but as the project is small I just didn't care enough to find another way to do it.
The rest of the animations were done in Godot, I had to animate the wheel and shell and honestly that was not a great experience. I can't pinpoint exactly what I disliked in Godot's in-engine animation system but it has to do with the way the tracks are handled... plus the fact that you cannot convert anything to a bezier if you missed it when creating the track. I wasn't able to find if it was possible to have an automated way to insert key upon transform modification in the inspector, sometimes it just wouldn't apply the values I entered for a position/rotation, or it would not enter the right values even though that's what I wrote.
Next time I'll probably animate things directly in Blender.
Interactions/Scenes
I do not come from a programming background so I'm still learning lots of things programming-wise. I had help from my partner Alex on how to organize the logic. I choose to use GDScript for this project and honestly it was so great to be able to program directly in-engine and not though an external editor! I learned a bit of C# while working in Unity all these years but I don't have a strong attachement to it, so will keep using GDScript for my projects in Godot.
The fact that my 3D model was exported in one object and the hierarchy already done in Blender made it a bit annoying to work with since I wanted to re-arrange stuff around. I made a script that needed to be assigned per collisions from the model and that also made it frustrating that my objects were all in one FBX: I couldn't have a way to auto assign stuff like the outline mesh and had to do it by hand.
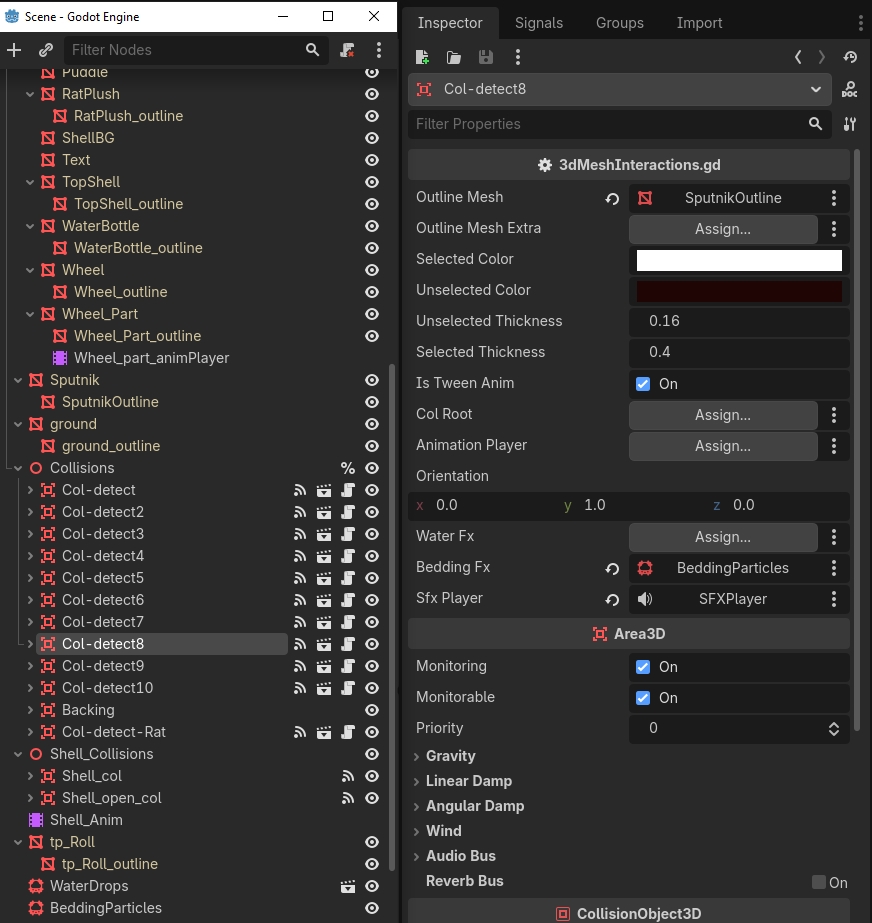
The Ratty Pocket 3D scene, you can see all the collisions "Col-detect" are inside a 3D node, seperated from the model. Yes I could've renamed them, no I didn't do it because I'm lazy.
In term of interactions, I wanted to be able to click on every objects and have them react to it. I wanted to have:
- Outline changing colors when hovering on an object
- Separate hold and release animation state
- Spawning particles and playing a sound depending on the animations
One script was added to each collision (the Col-detect nodes you can see above), it handles everything concerning the interactions with the objects: changing the outline color, animations, particle spawning, SFX playing. Each "Col-detect" has another node inside with a script handling the animations grab/release/cancel states whether they're tweens or godot animations. The shell itself has a script for the global interactions like detecting if the shell is open or closed to enable/disable all the collisions for the interactable objects.
The camera script comes from LucaJunge, it's a bit old but it worked well on PC. The mobile controls don't seem to be up to date but I haven't investigated this yet, I didn't feel like making my own camera control script was worth it for this project.
The rest of the scene is quite simple, the WorldEnvironment is there to set the ambient light color, the tilable background is just made of two planes added as children of the camera so it moves with it as it rotates around the model and a music player is set on loop autoplay for the background music.
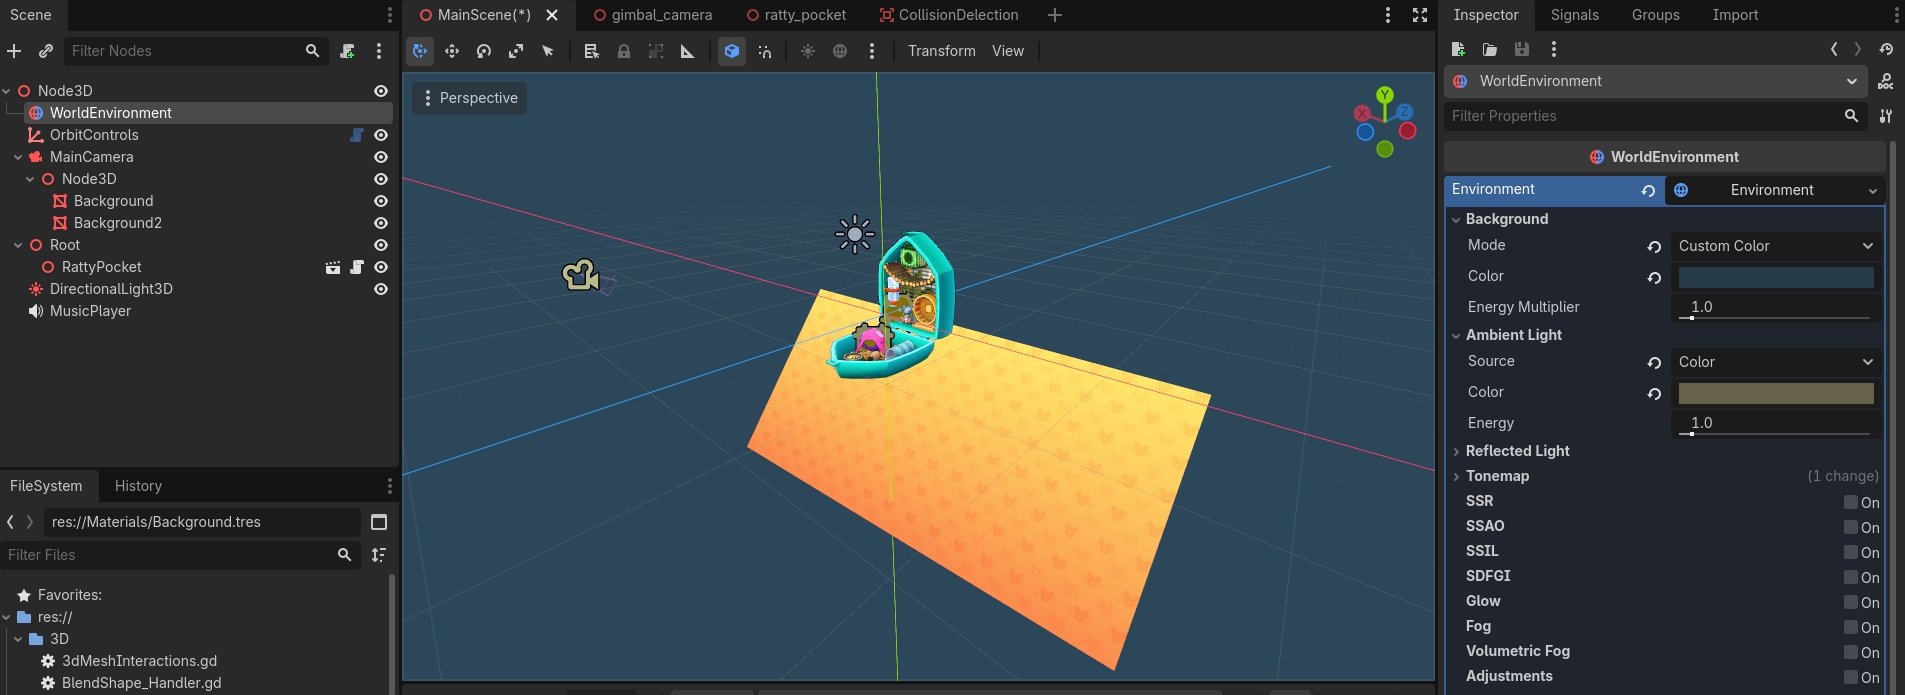
So small and cute.
That's about it, I don't think I have anything else I wanted to show from this project!
I'm glad I finally had time to work on something like this, I learned so much during the process. I wanted to find a good excuse to practice working with 3D objects and various interactions in Godot and I feel like this was the perfect project for it!
If I had to do it again, I wouldn't be so lazy with my 3D model export. I would export each object independently and recreate the scene and hierarchy in Godot instead of doing it in Blender. I would also probably animate objects directly in Blender instead of Godot. Next time, I also need to plan a bit better the whole scene logic beforehand, I had to refactor a couple of things because I didn't sit down before I programmed certain features.
Aside from that I'm proud of this project, the scope was perfect to experiment with various things without strong time constraints. I hope it was informative, that's it for today!
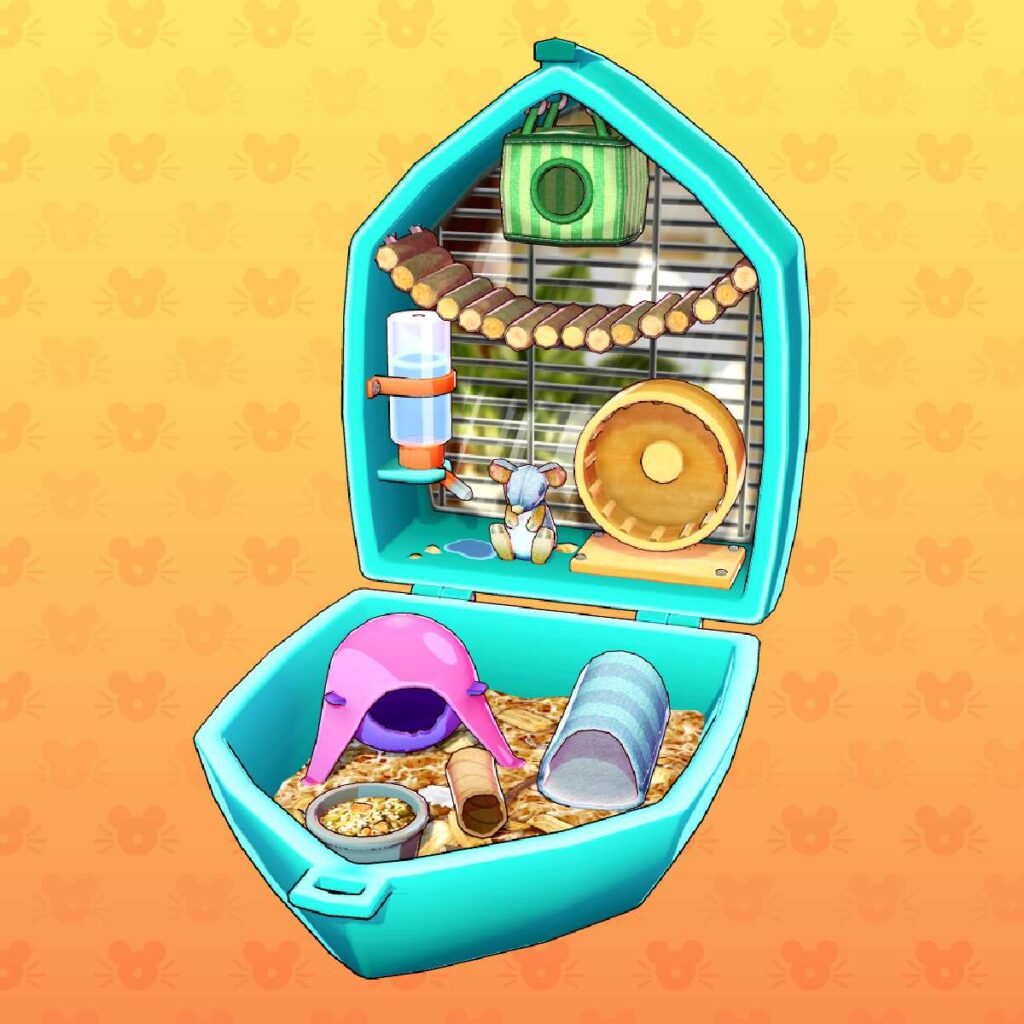
ByeBye 👋🐁