This blog post was part of an old breakdown I made a few years ago, I'm reposing it on my website now! You can check the 3D model here.
In this post I'm going to talk about the shaders I made for this project. I used Amplify Shader in Unity, but you will be able to make these shaders the same way in any node-based shader plugins, as long as you know how the nodes are called! I created 4 shaders in total and I'm going to do a small breakdown for each.
Main Environment Shader
The first shader I'm going to talk about is the main environment shader. At the end of the previous post about texturing, I didn't explain how I exported my textures since it was linked to the shader.
I am trying to keep my texture count low for this project so my environment has only 2 maps: a Base Color and a MRE.
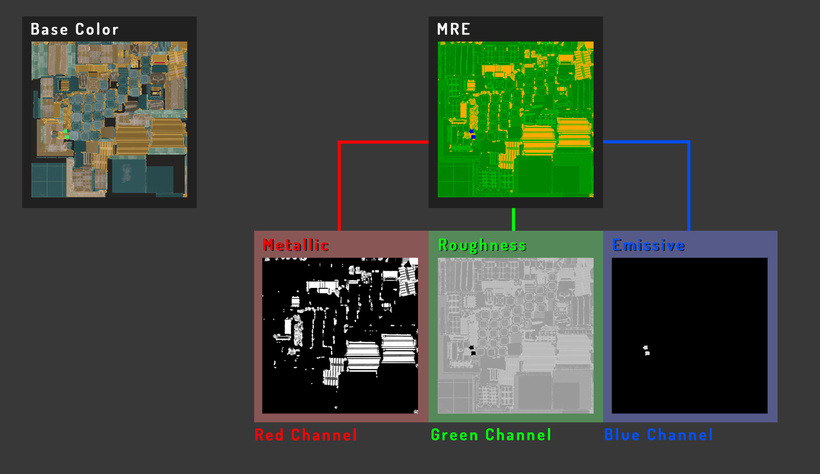
MRE stands for Metallic, Roughness and Emissive. It's not a *real* term you can make one up.
Since a Metallic, Roughness and Emissive map can be just greyscale I packed the 3 of them in one map to gain some space. Substance Painter and Designer let's you decide what maps you want to pack in a single texture, it's referred as Channel Packing. It can be harder to do channel packing in traditional 2D image editor, as single channel editing is not a common feature. You can always combine maps into one texture in softwares liked Substance Painter/Designer or Material Maker.
This is my main environment shader:
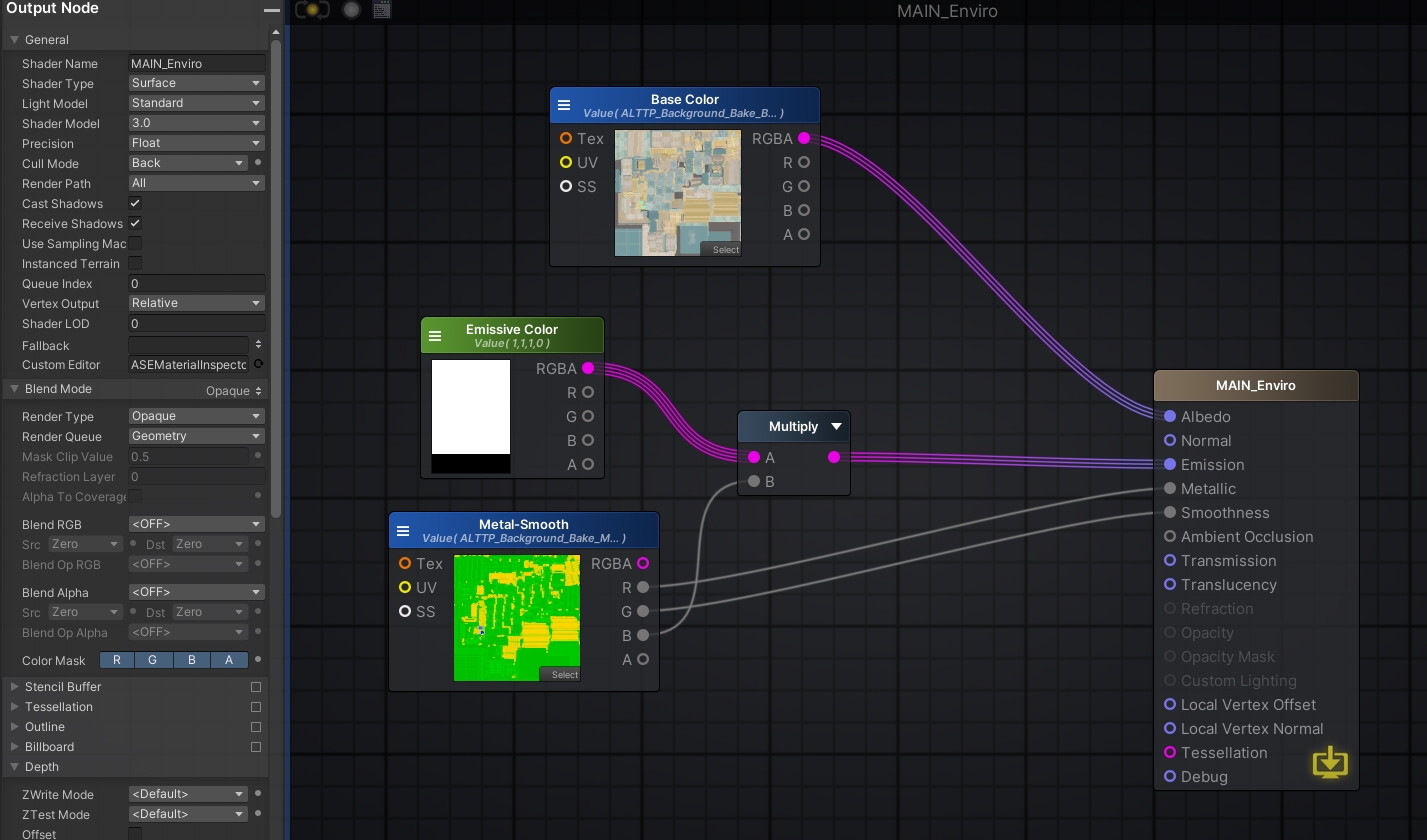
As you can see it's very simple, I'm just using a standard PBR shader.
The Base Color is simply plugged into the Albedo. The Emissive map channel is multiplied by a color, since the channel is in greyscale that allows me to have a bit of color control, the goal is to reuse this shader in future 3D models as well.
I wanted to keep this shader simple, since the glass shader on top of the mode will be adding details.
Door Shader
The second shader I am going to talk about is the one I made for the door. With a standard material, you can see the door is going over the wall when it's open. Since I want to animate the door model to open and close upon clicking, this is going to be an issue.
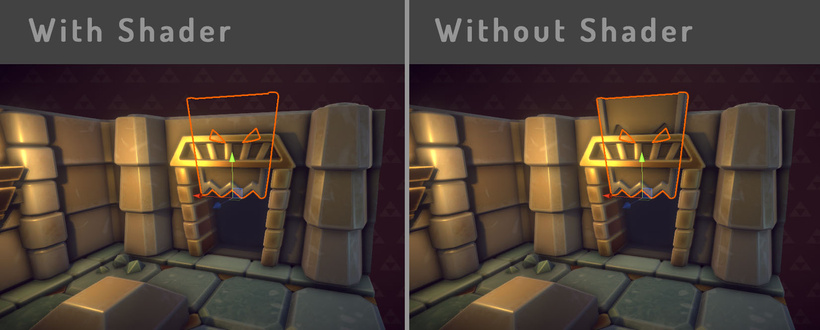
THANKFULLY, SHADERS ARE HERE TO SAVE THE DAY!!
This shader is a transparent cutout shader PBR, the top part is the same as the main environment shader: a Base Color and MRE.
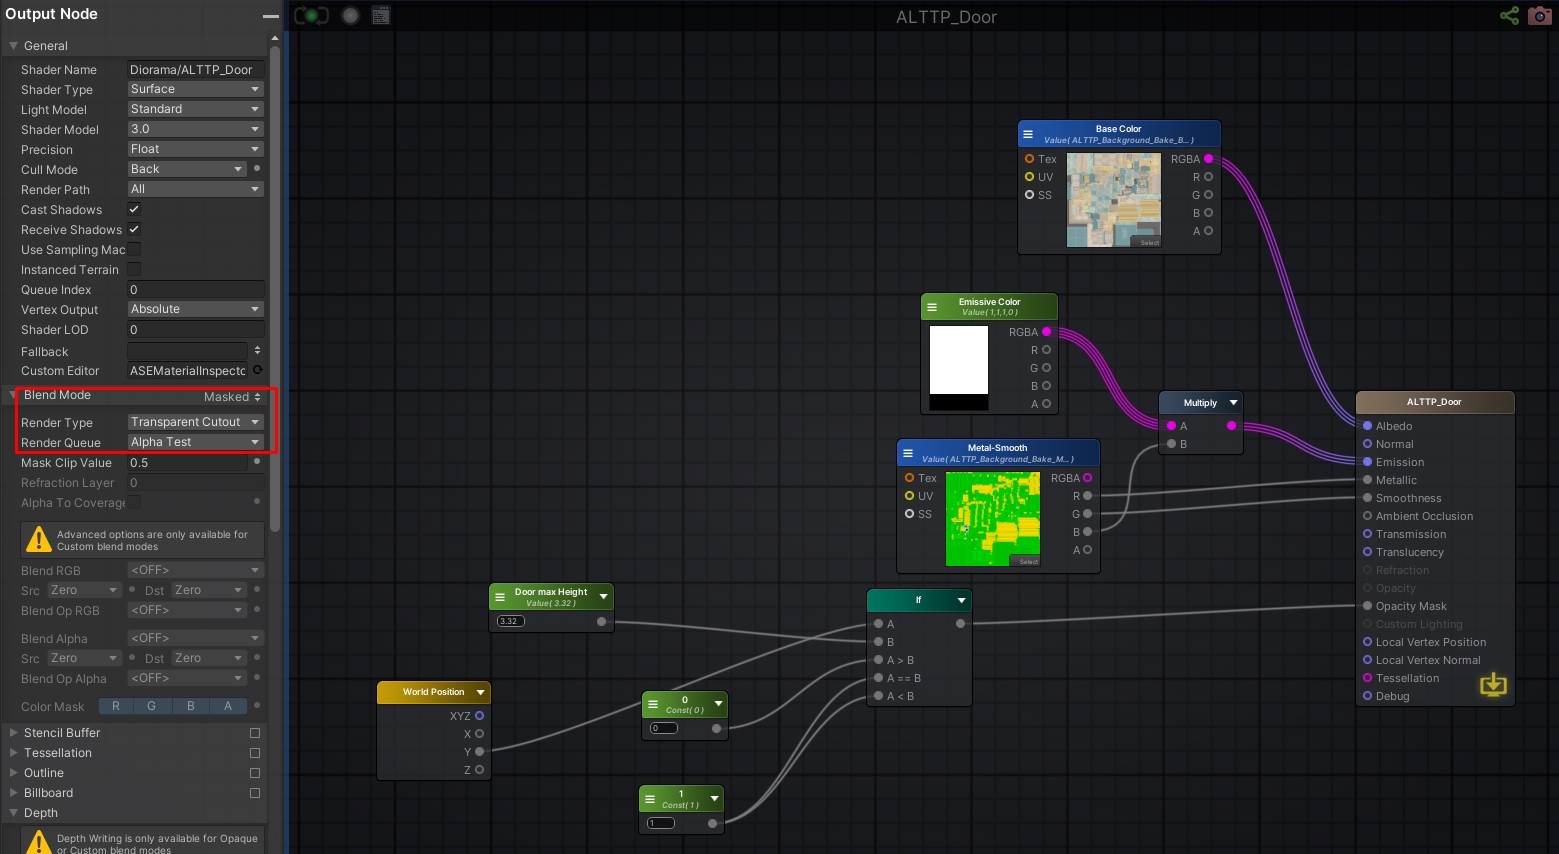
Using the same textures as the rest of the model.
The bottom part with a "if" is where the transparent mask gets created. I am comparing the world position of every pixel with a value called "Door Max Height", this is the position where I want the door to disappear, the value is plugged in Opacity Mask since it's a cutout shader.
What the "if" does node does here: A is the vertical position of each pixel rendered in the shader. The value in B, "Door max Height" represents the highest wall position. If A is greater than B, opacity will be 0, so the pixels will be fully transparent. If A is equal or smaller than B, opacity will be 1, so the pixels will be opaque. All this means that if a pixel position is higher than the Door Max Height value, it'll be transparent.
There are other ways to do this kind of effect, by using stencil shader for example. I choose this method since it was quick to do and my model is not moving or a props part of a big enivornment, so these position values will never change.
Outer Glass Shader
The next Shader is the outer glass shader, I used a different shader for the outer and inner sides of the glass case. This is also a transparent PBR shader.
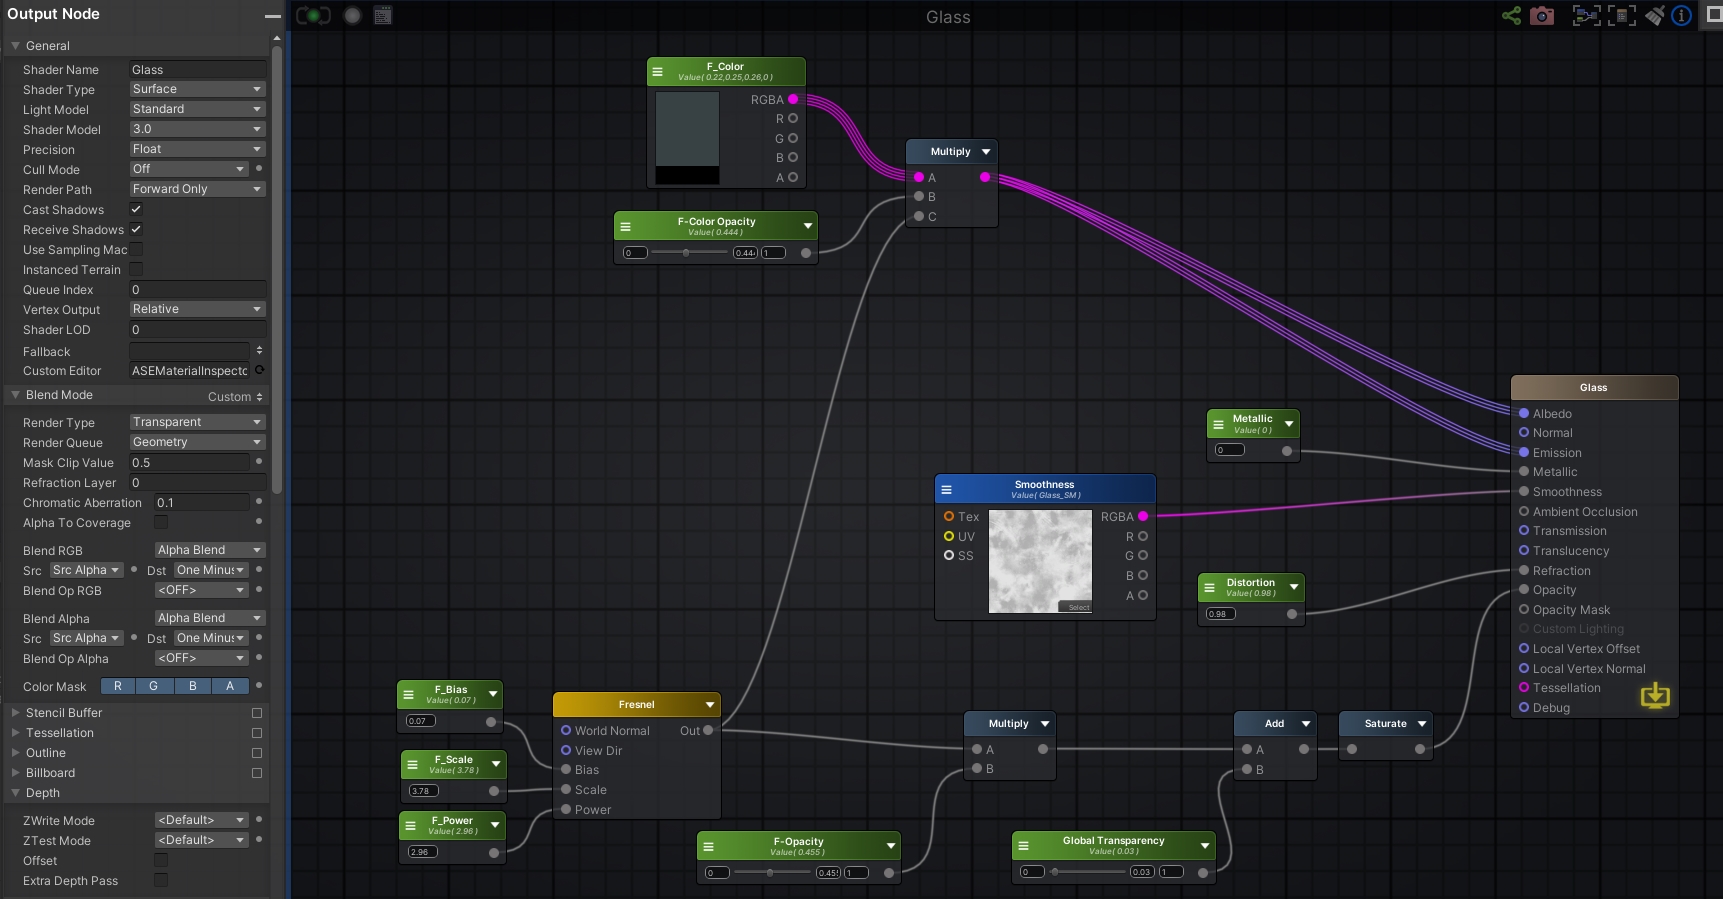
You can see the render queue on the left is labeled as Geometry: it's so I was able to modify the Blend options below. I don't remember why because it's been years now but having the render queue as Transparent would make bright white artifacts on the edges... I think it has something to do with transparency on top of a custom skybox shader I made, but I'm not 100% sure.
The main feature of this shader is the fresnel, it has multiple values to control the size, level, and opacity.
Those fresnel values are plugged in Opacity input to control the global opacity of the glass but also plugged into a multiply to change the glass color that goes into the Albedo and the Emission input. I used the Emission input to make the glass glow a bit to achieve a more stylized look.
I also added a Roughness map, Smoothness in Unity, for the reflections, and put the metallic value to 0. The roughness is just a random noise from Substance Designer.
The last parameter is the Distortion. I plugged a float into the Refraction input, it displaces a bit the model visuals when you turn around it (and it looks cool).
Inner Glass Shader
The Inner Glass Shader is a bit different from the outer one. Unlike the others, this shader is Unlit. I am using an Unlit Shader because it's the inside of the glass and I don't want it to be affected by light.
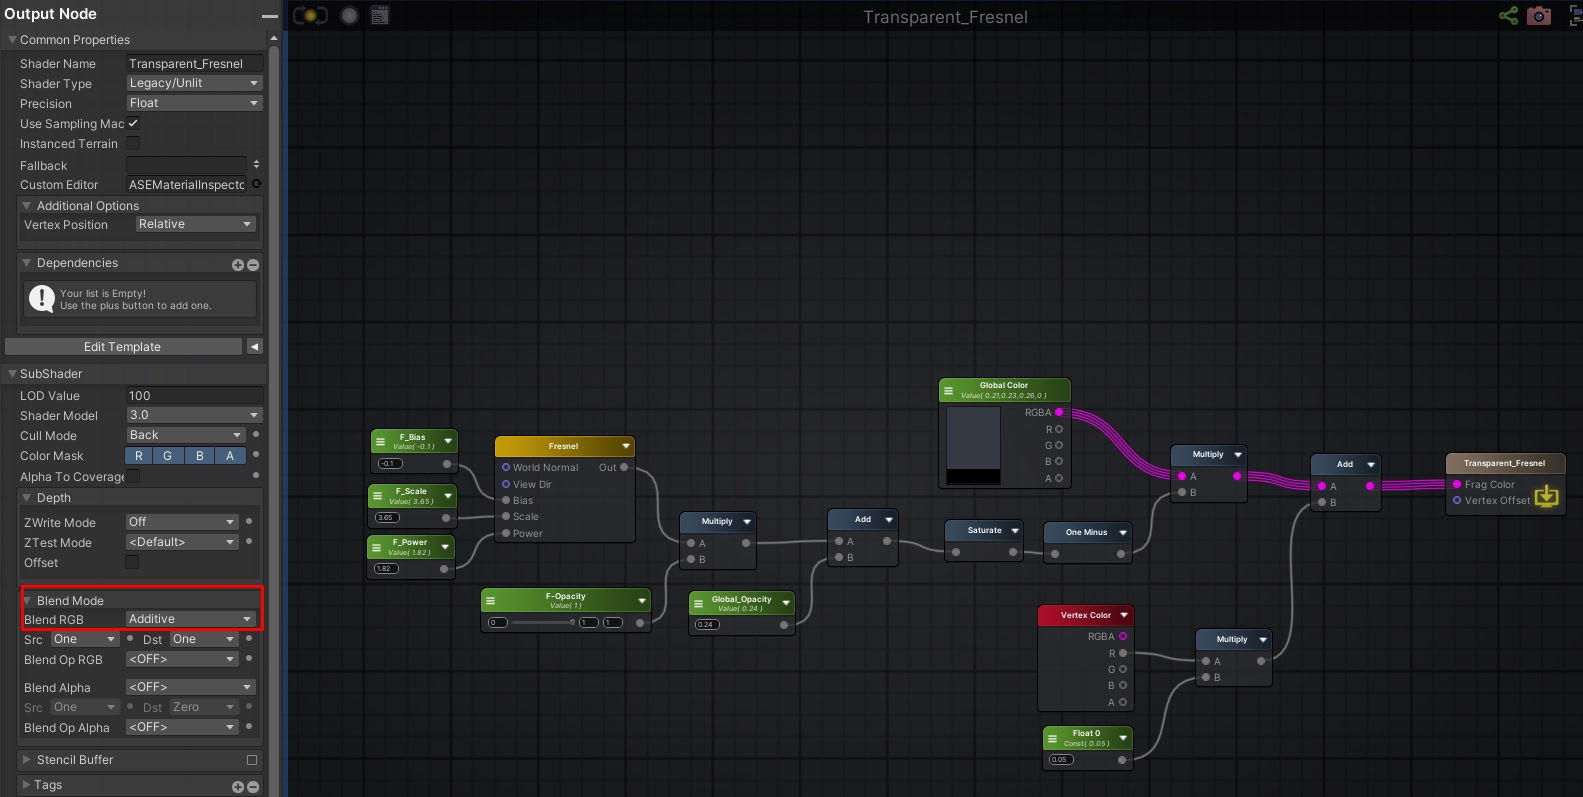
You can see it's unlit since it only have one Output on the end node.
One important detail is that the Blend mode for this shader is additive. This way the luminosity of the color that you will input in the end will change the global opacity of the mesh, I find it easier to tweak that way.
This shader uses a fresnel like the Outer glass shader, but at the end I invert the values with a One Minus. Since the inner part of the mesh is inside out the fresnel needs to be inverted. I also multiply the vertex color values to the end result, so edges will be more opaque. I added white vertex color values to the edges of the glass:
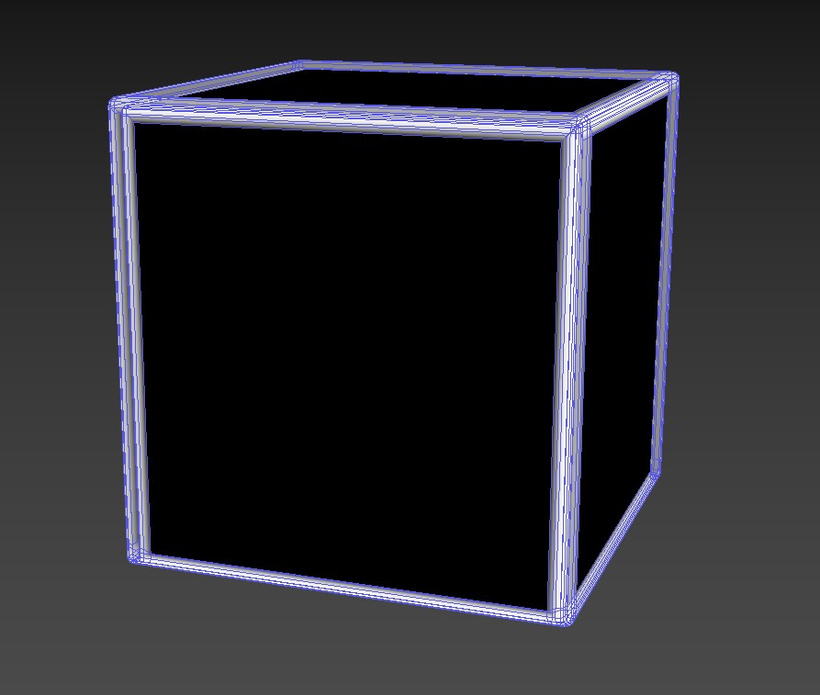
Showing only the inside of the model.
Here is the glass end result:
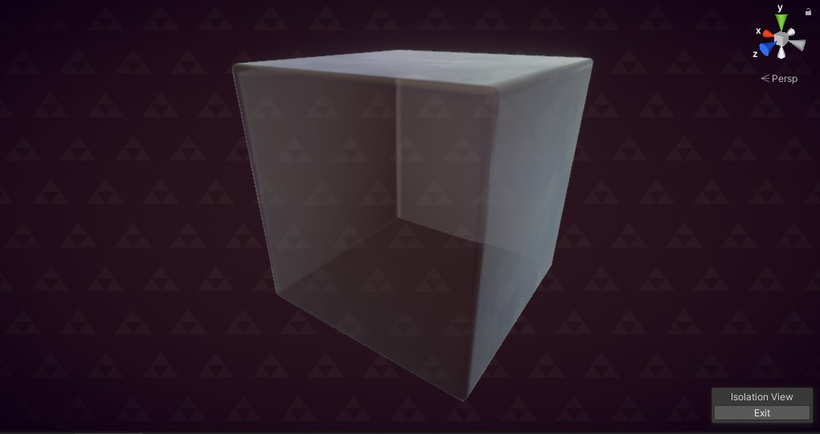
Wow!
Since the outer glass shader have back culling, you are only seeing one inside of the 3D mesh with the Inner shader. Since these two shaders are transparent they need to have a different render queue. The inner material is set to 3000 and the outer one to 3200 (Unity values). That means the inner part gets rendered before the outer, to avoid any visual issues.
That's it for the shader part, next one is going to be about Link model, texture & shader.
Bye-bye 👋🐁